React Native SDK
블럭스 React Native SDK 를 설치하고 사용하는 방법을 알아봅니다.
푸시 메시지 ��연동
[iOS] Xcode 설정
Notification Capability 추가
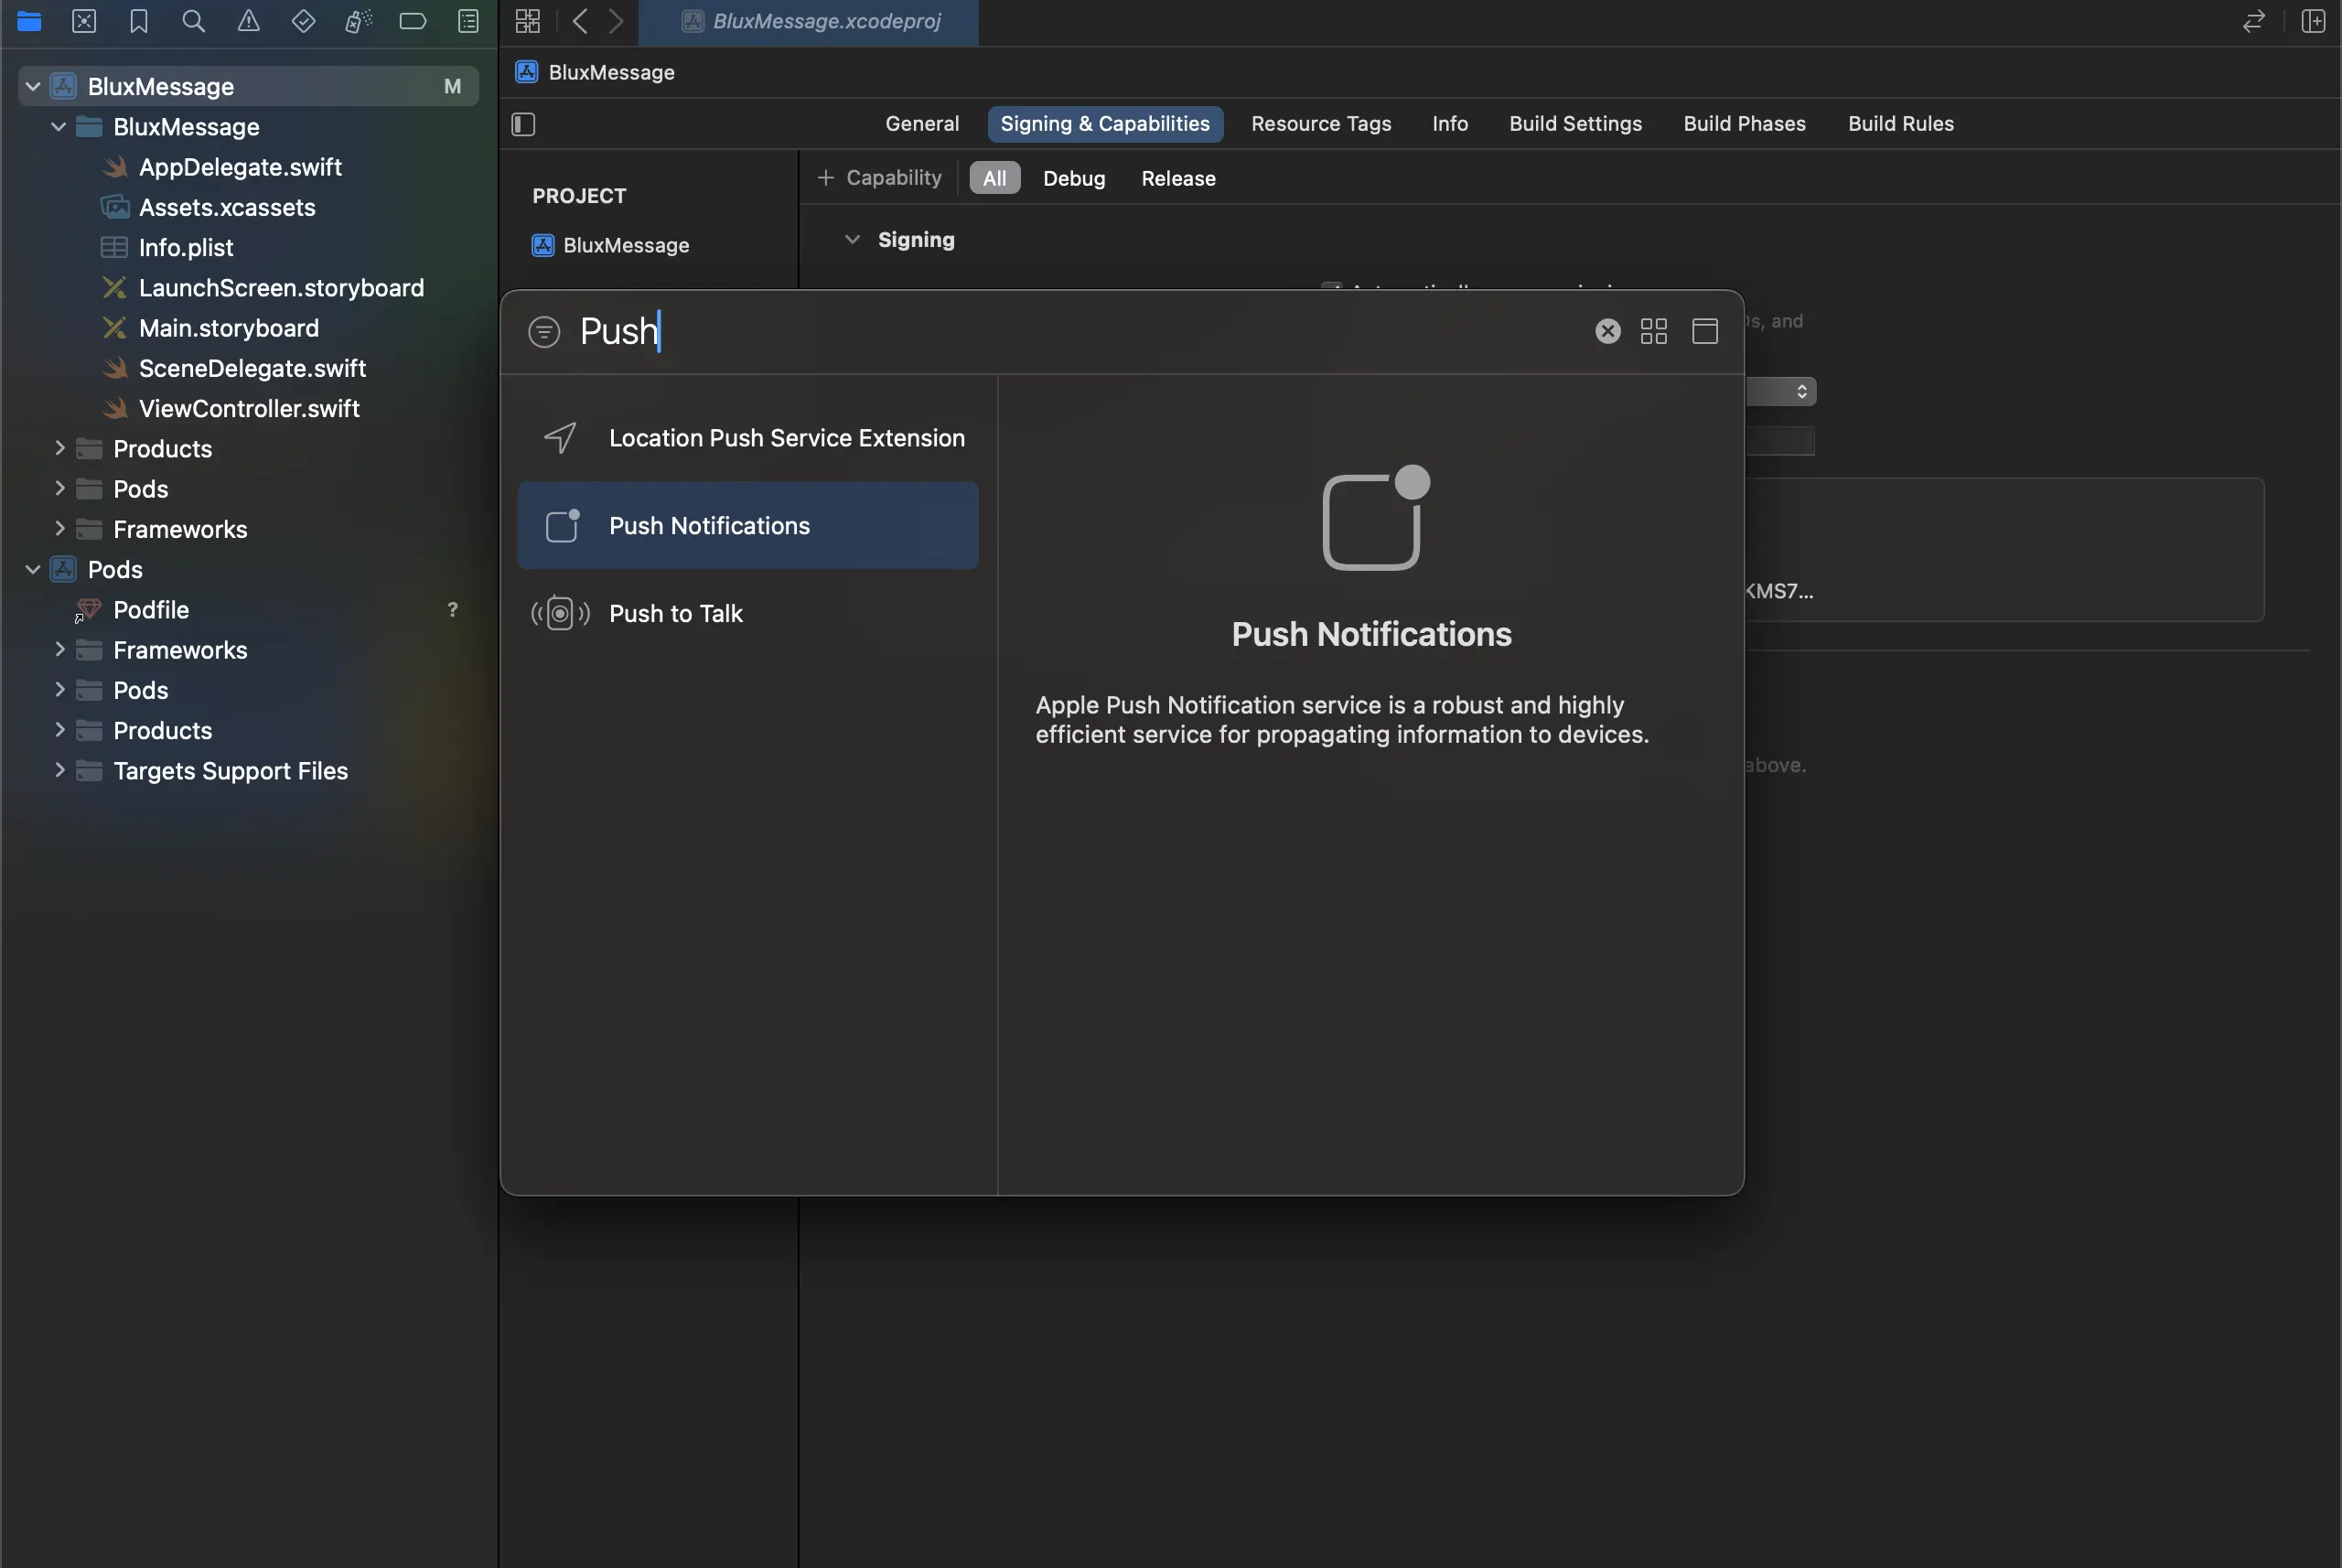
Xcode 프로젝트 설정의 Signing & Capabilities 탭에서 + Capabilities를 클릭하세요.
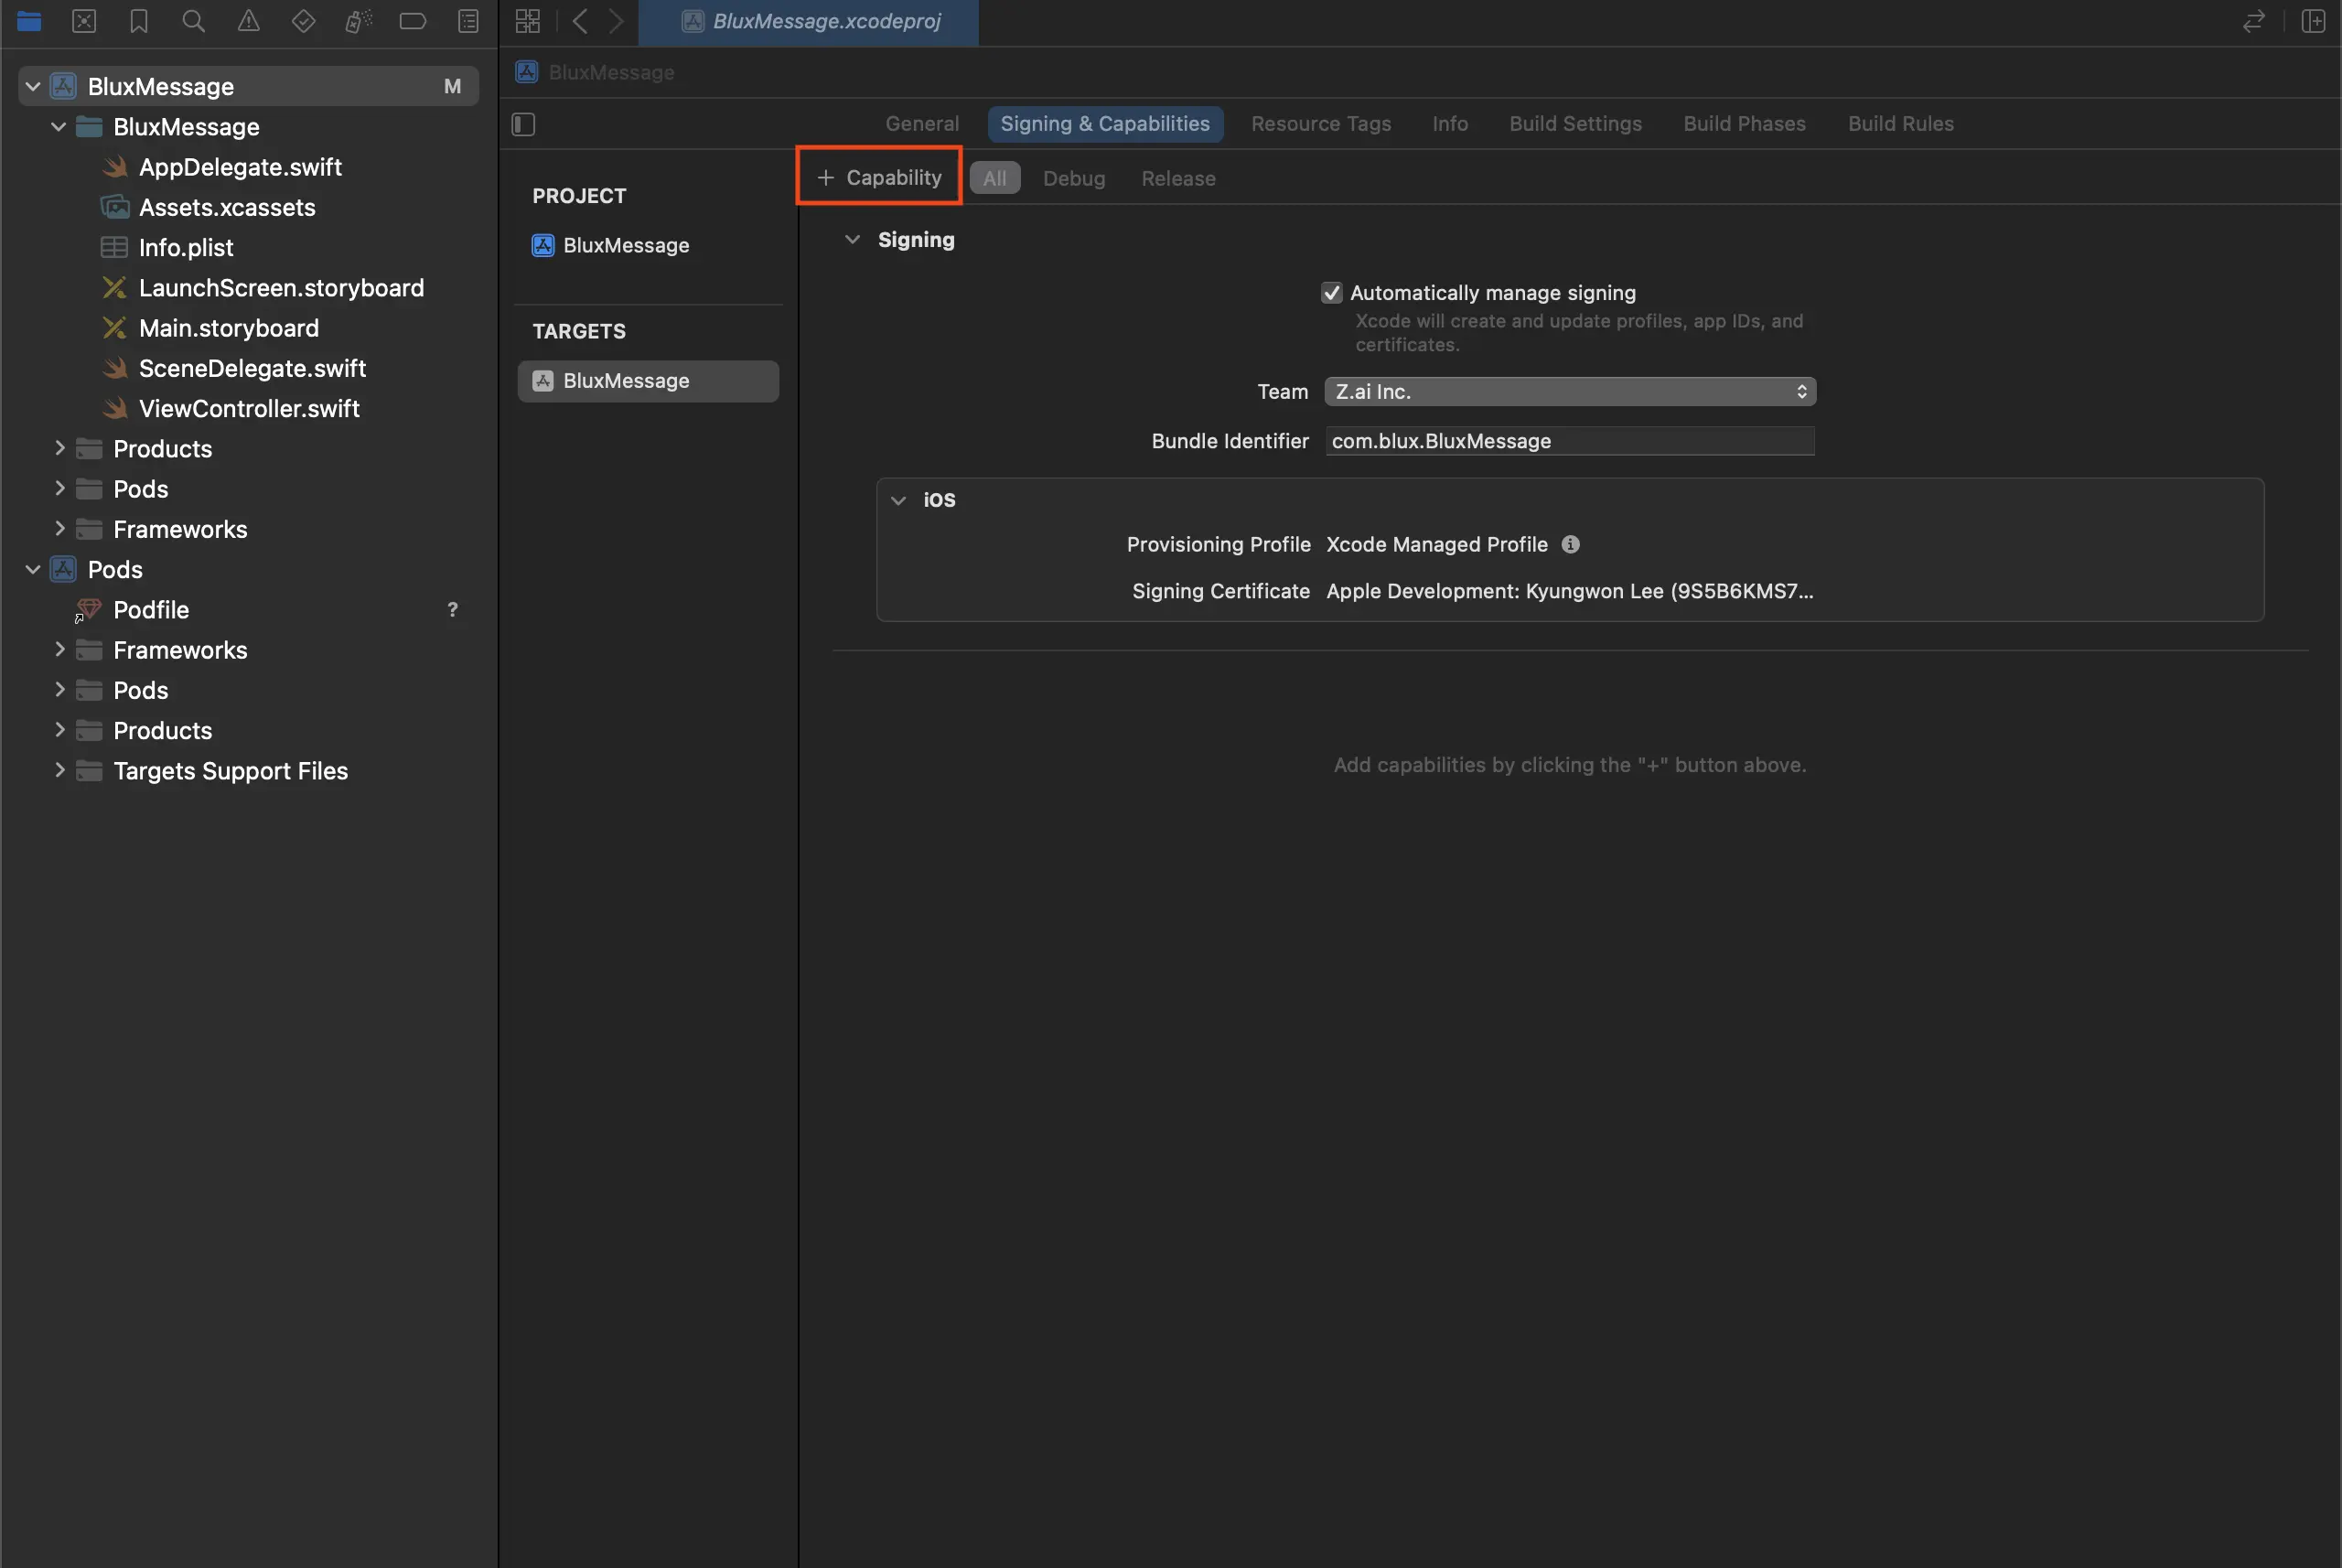
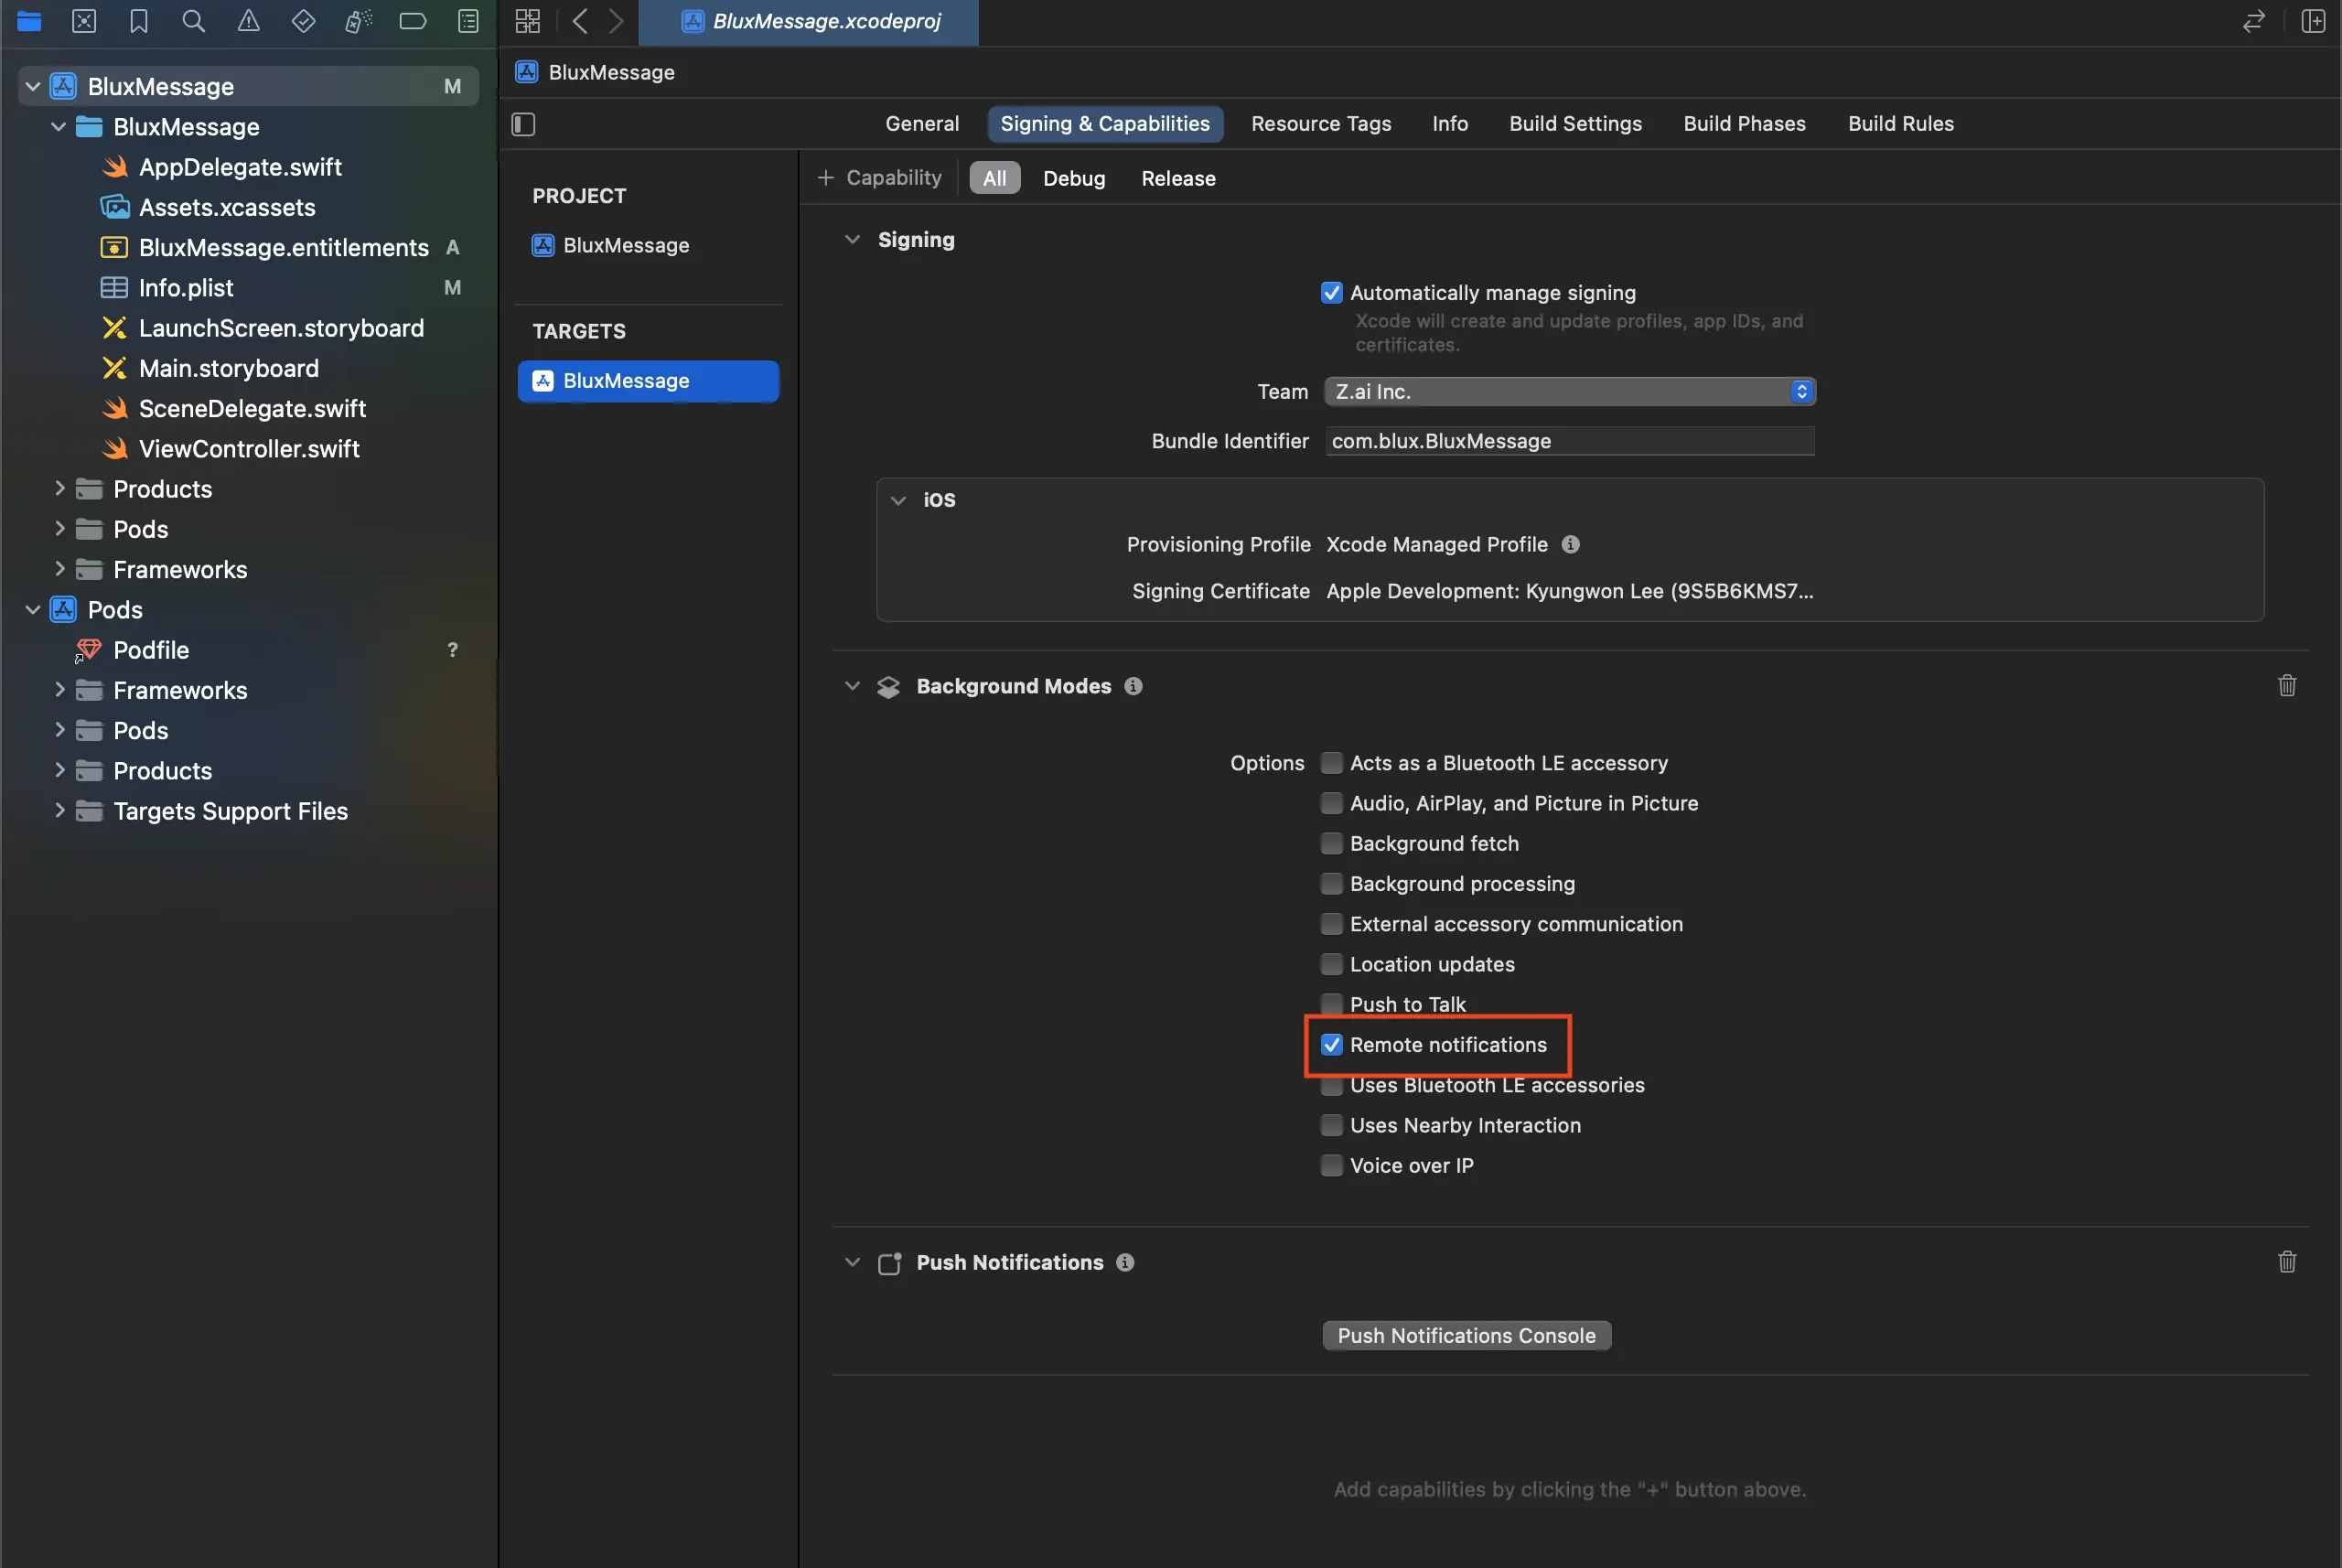
Push Notifications와 Background Modes를 추가하세요.
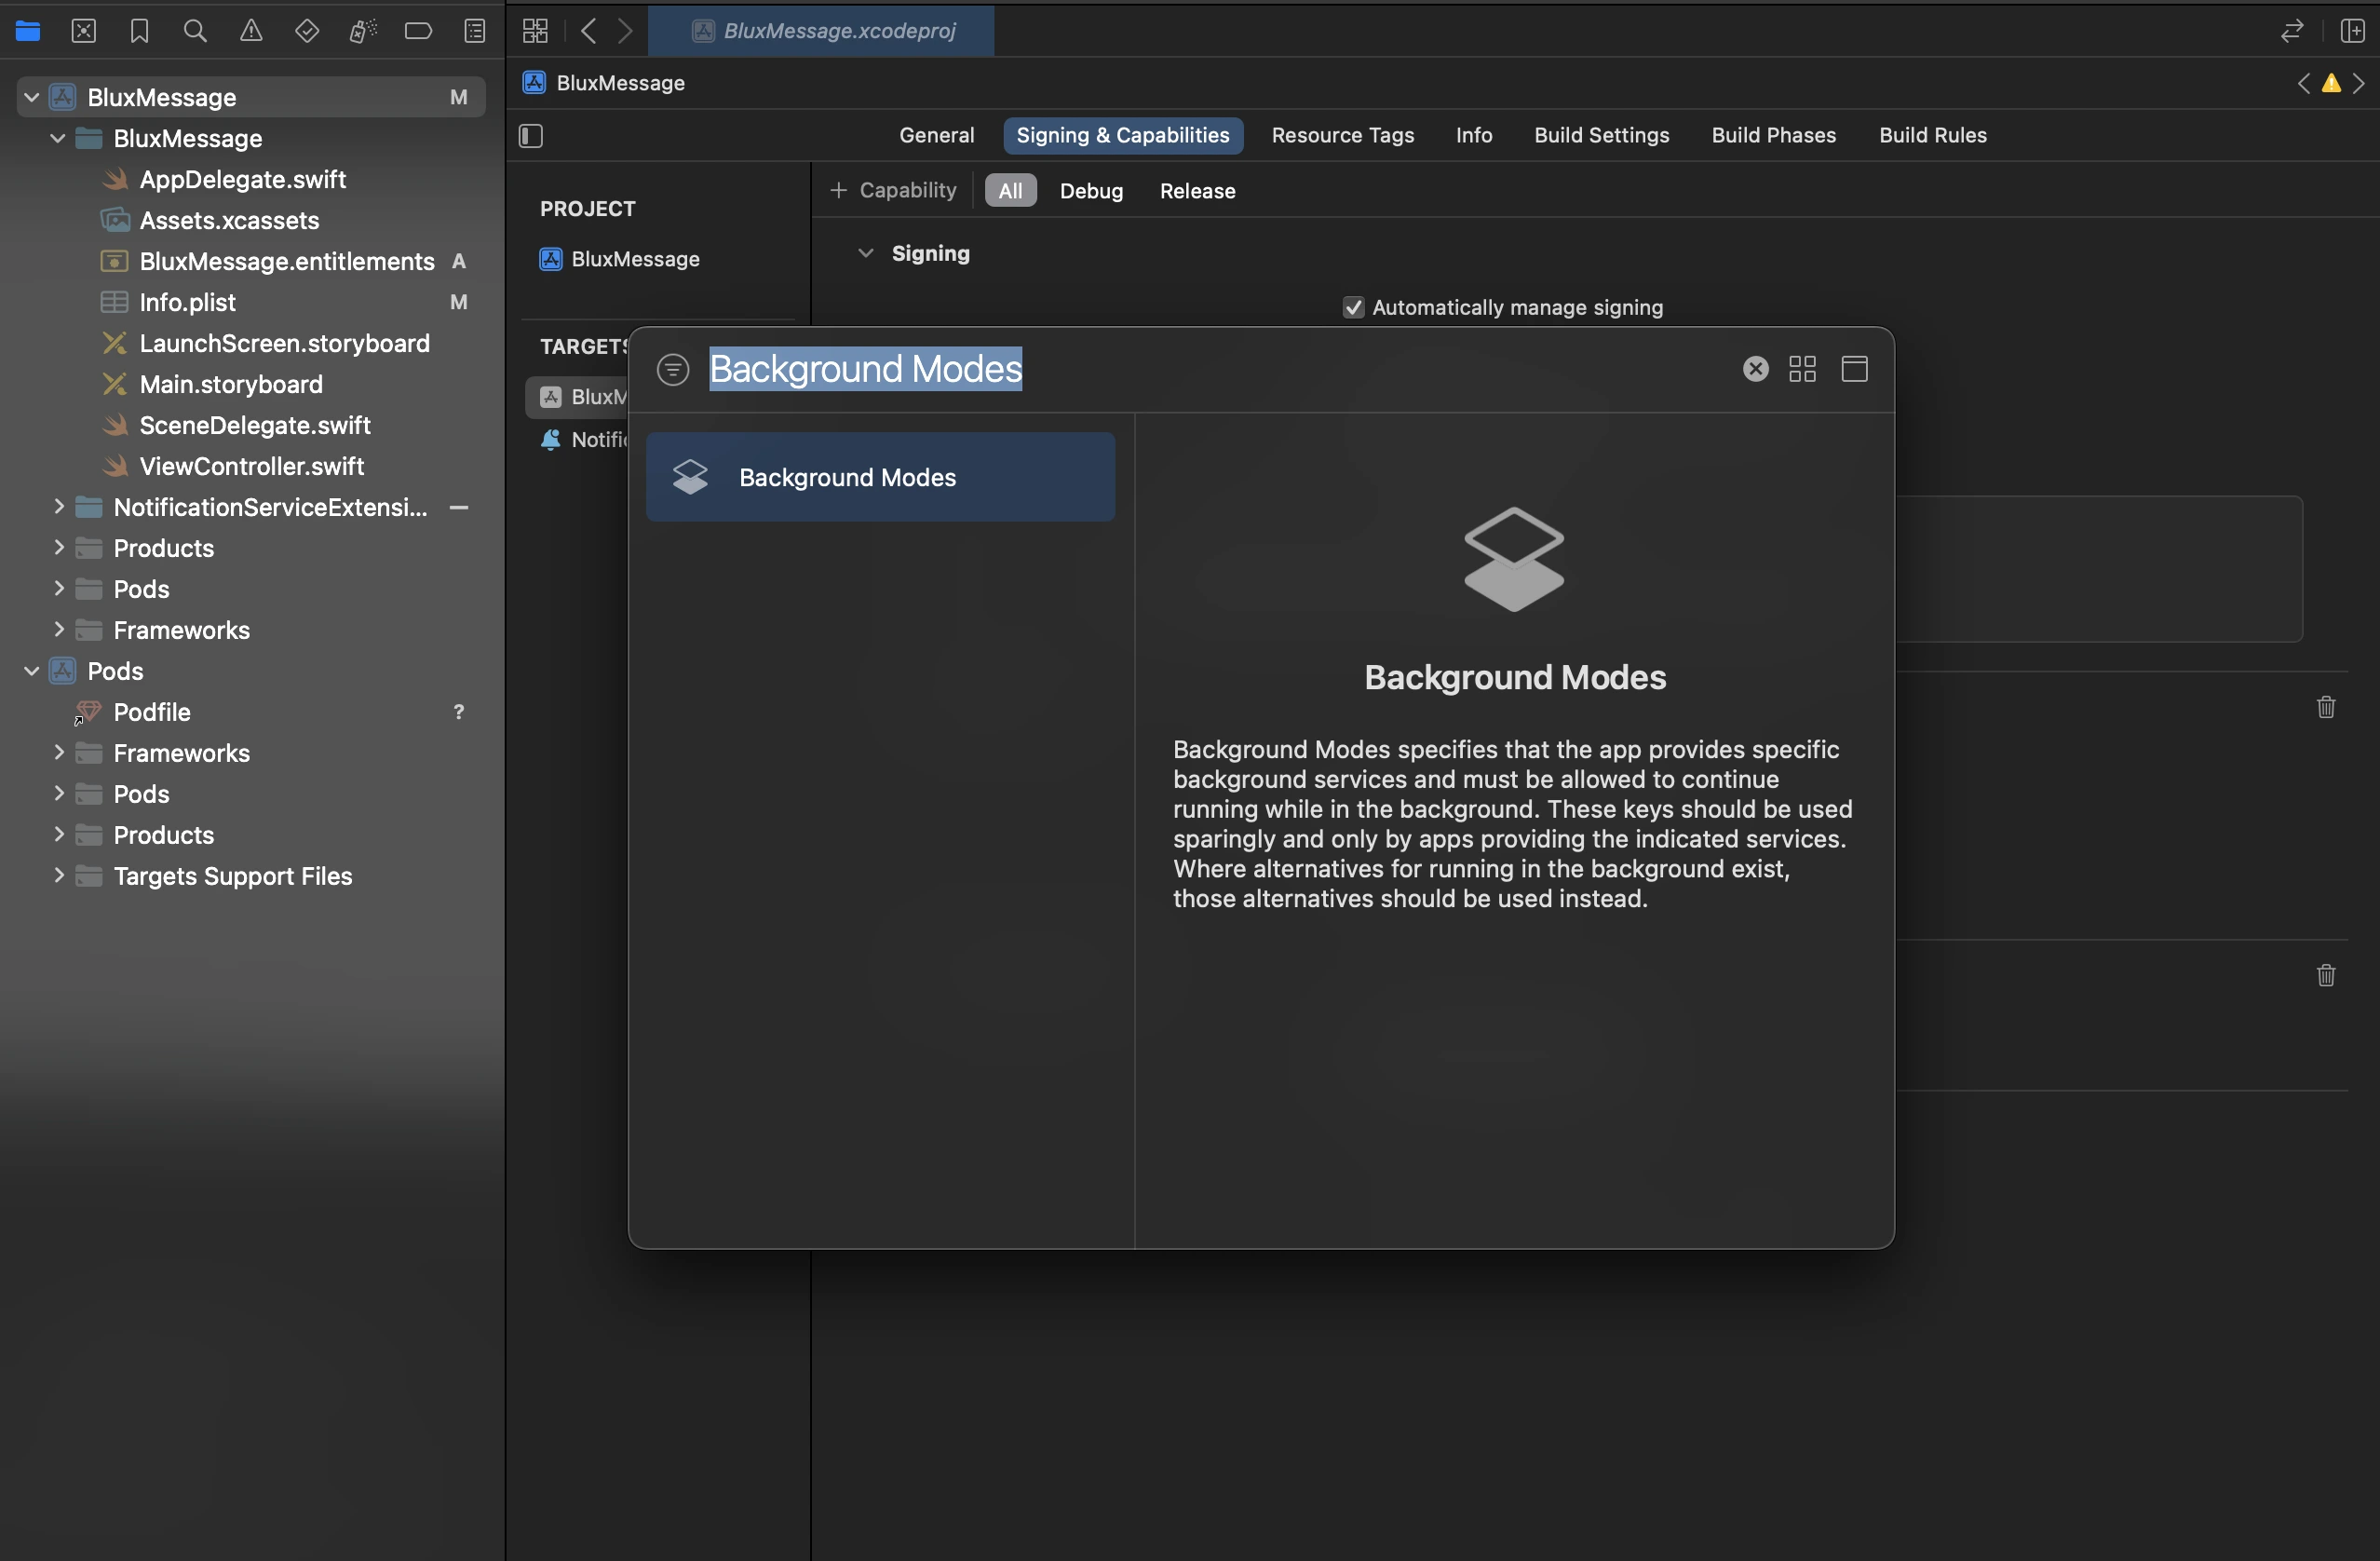
Background Modes에서 Remote notifications를 활성화하세요.
Service Extension 설정
Xcode 프로젝트 상단
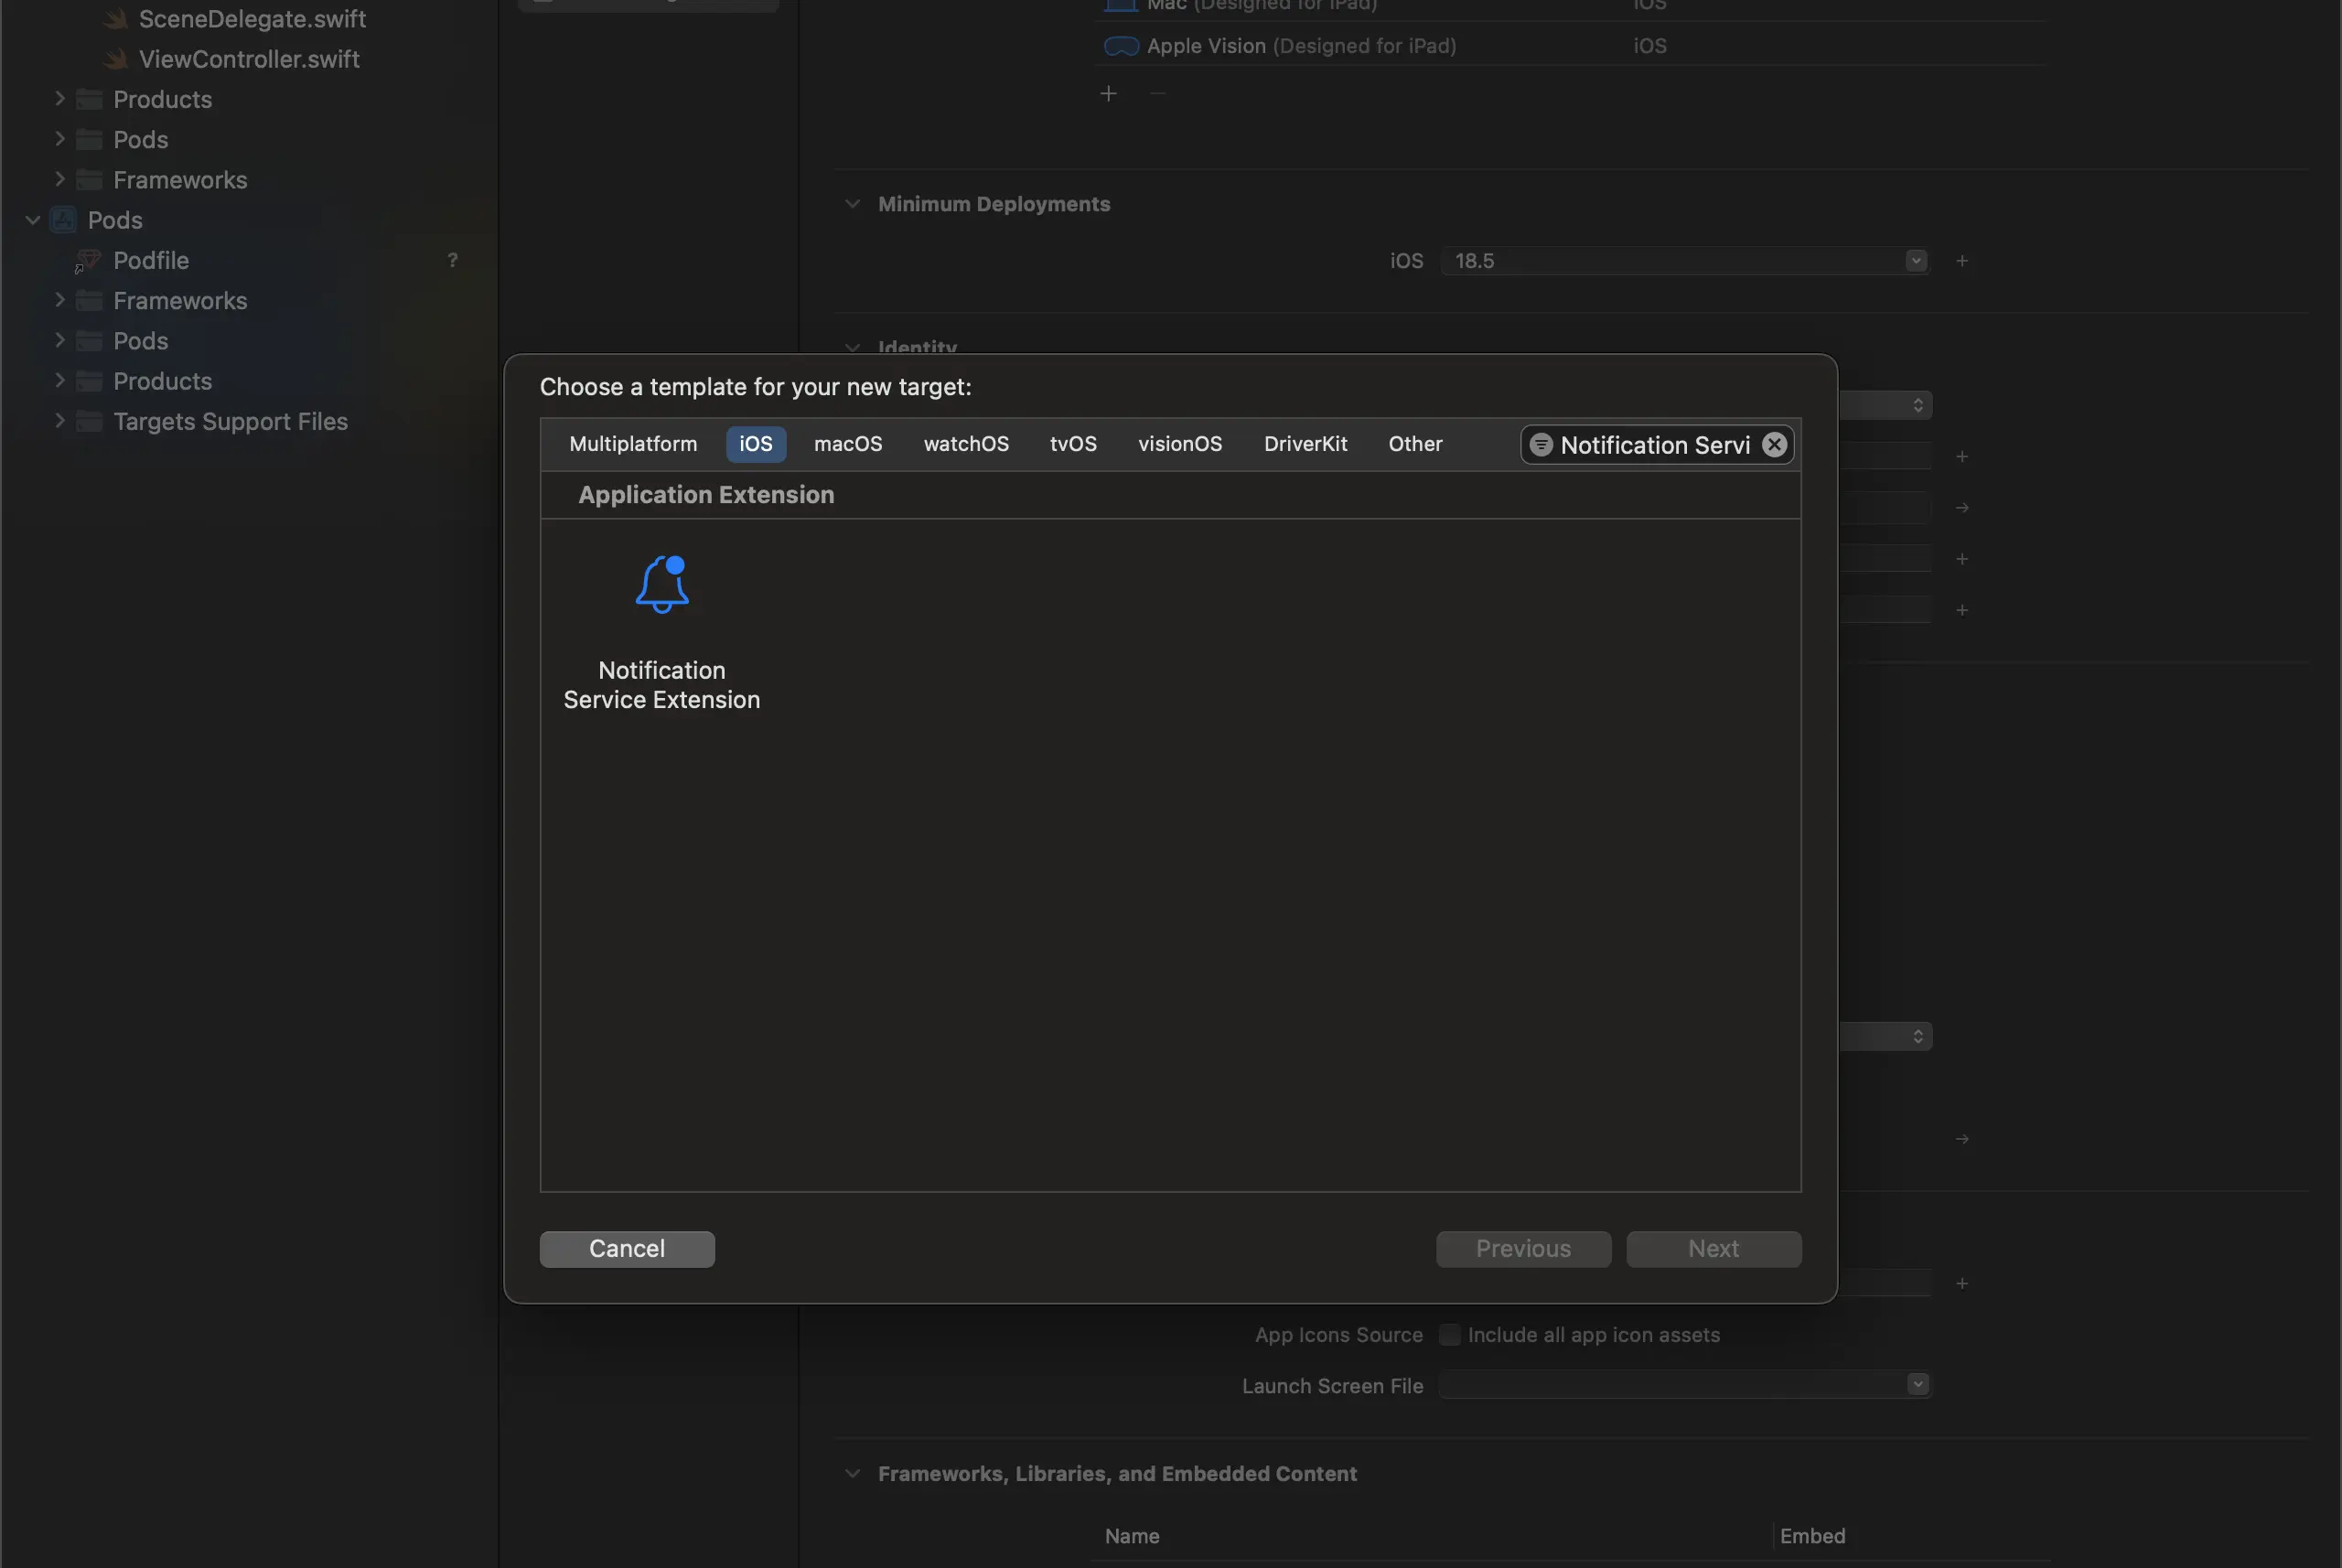
File > New > Target을 클릭하고 아래와 같이 Notification Service Extension을 선택하세요.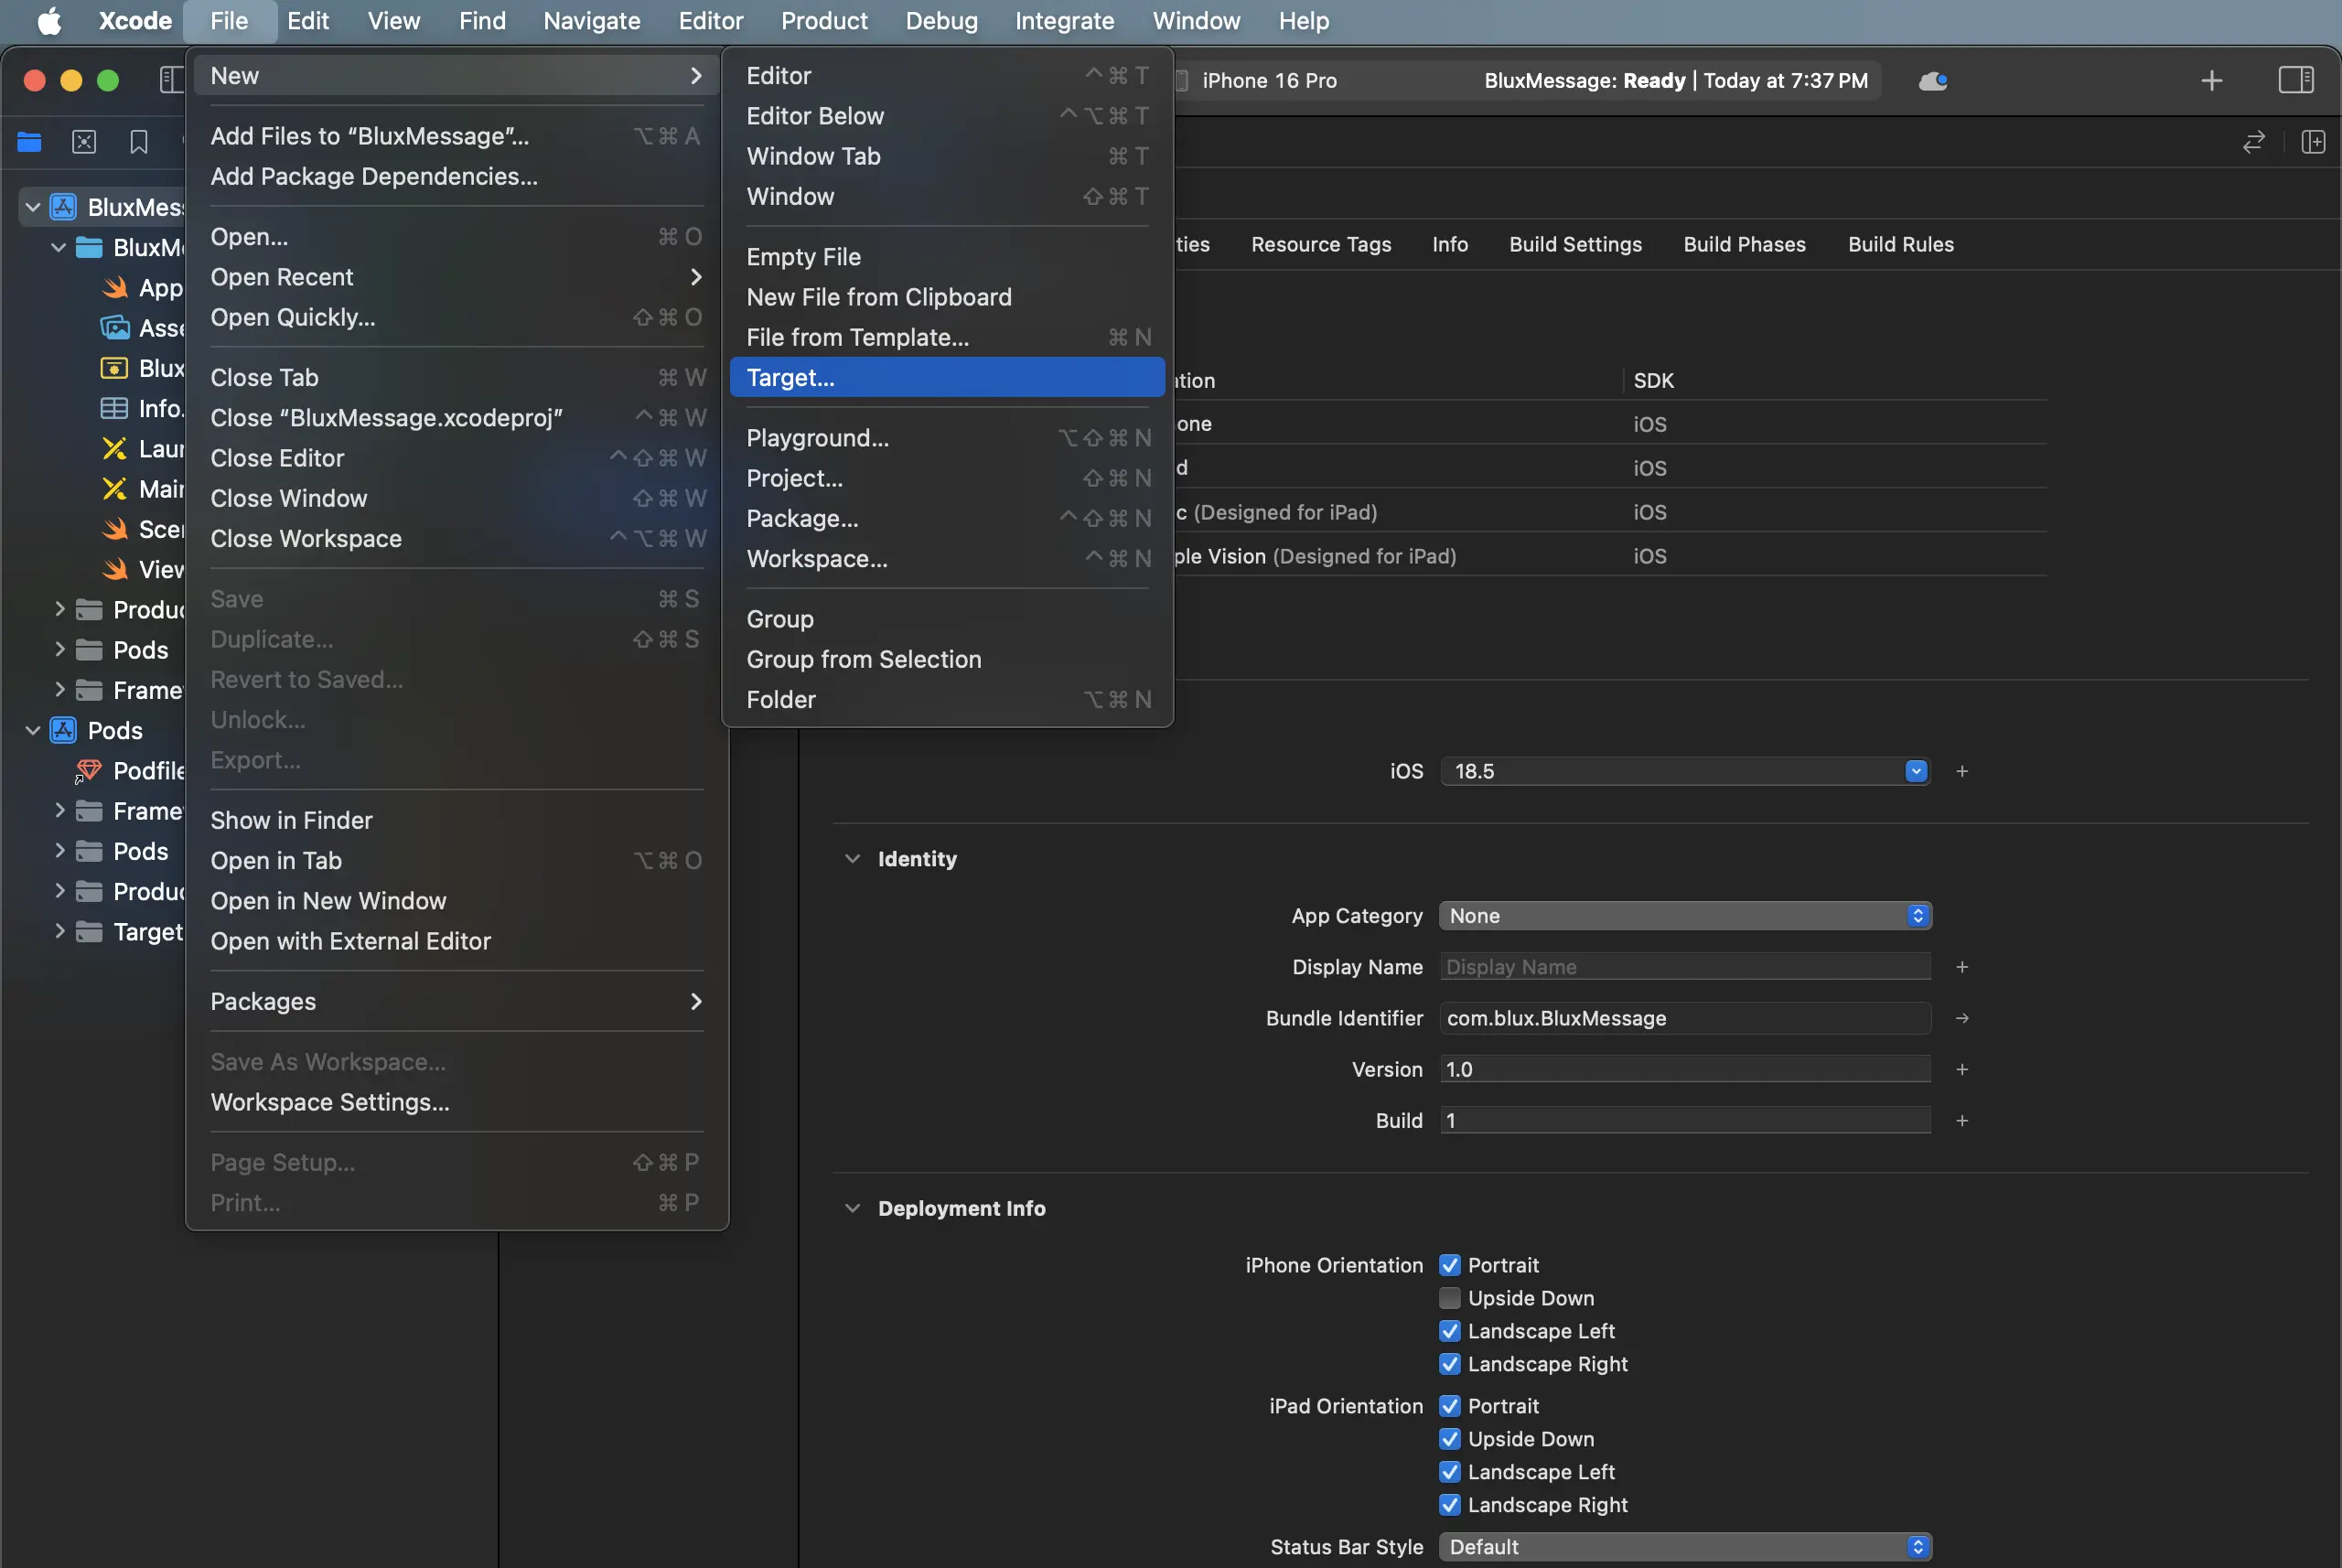
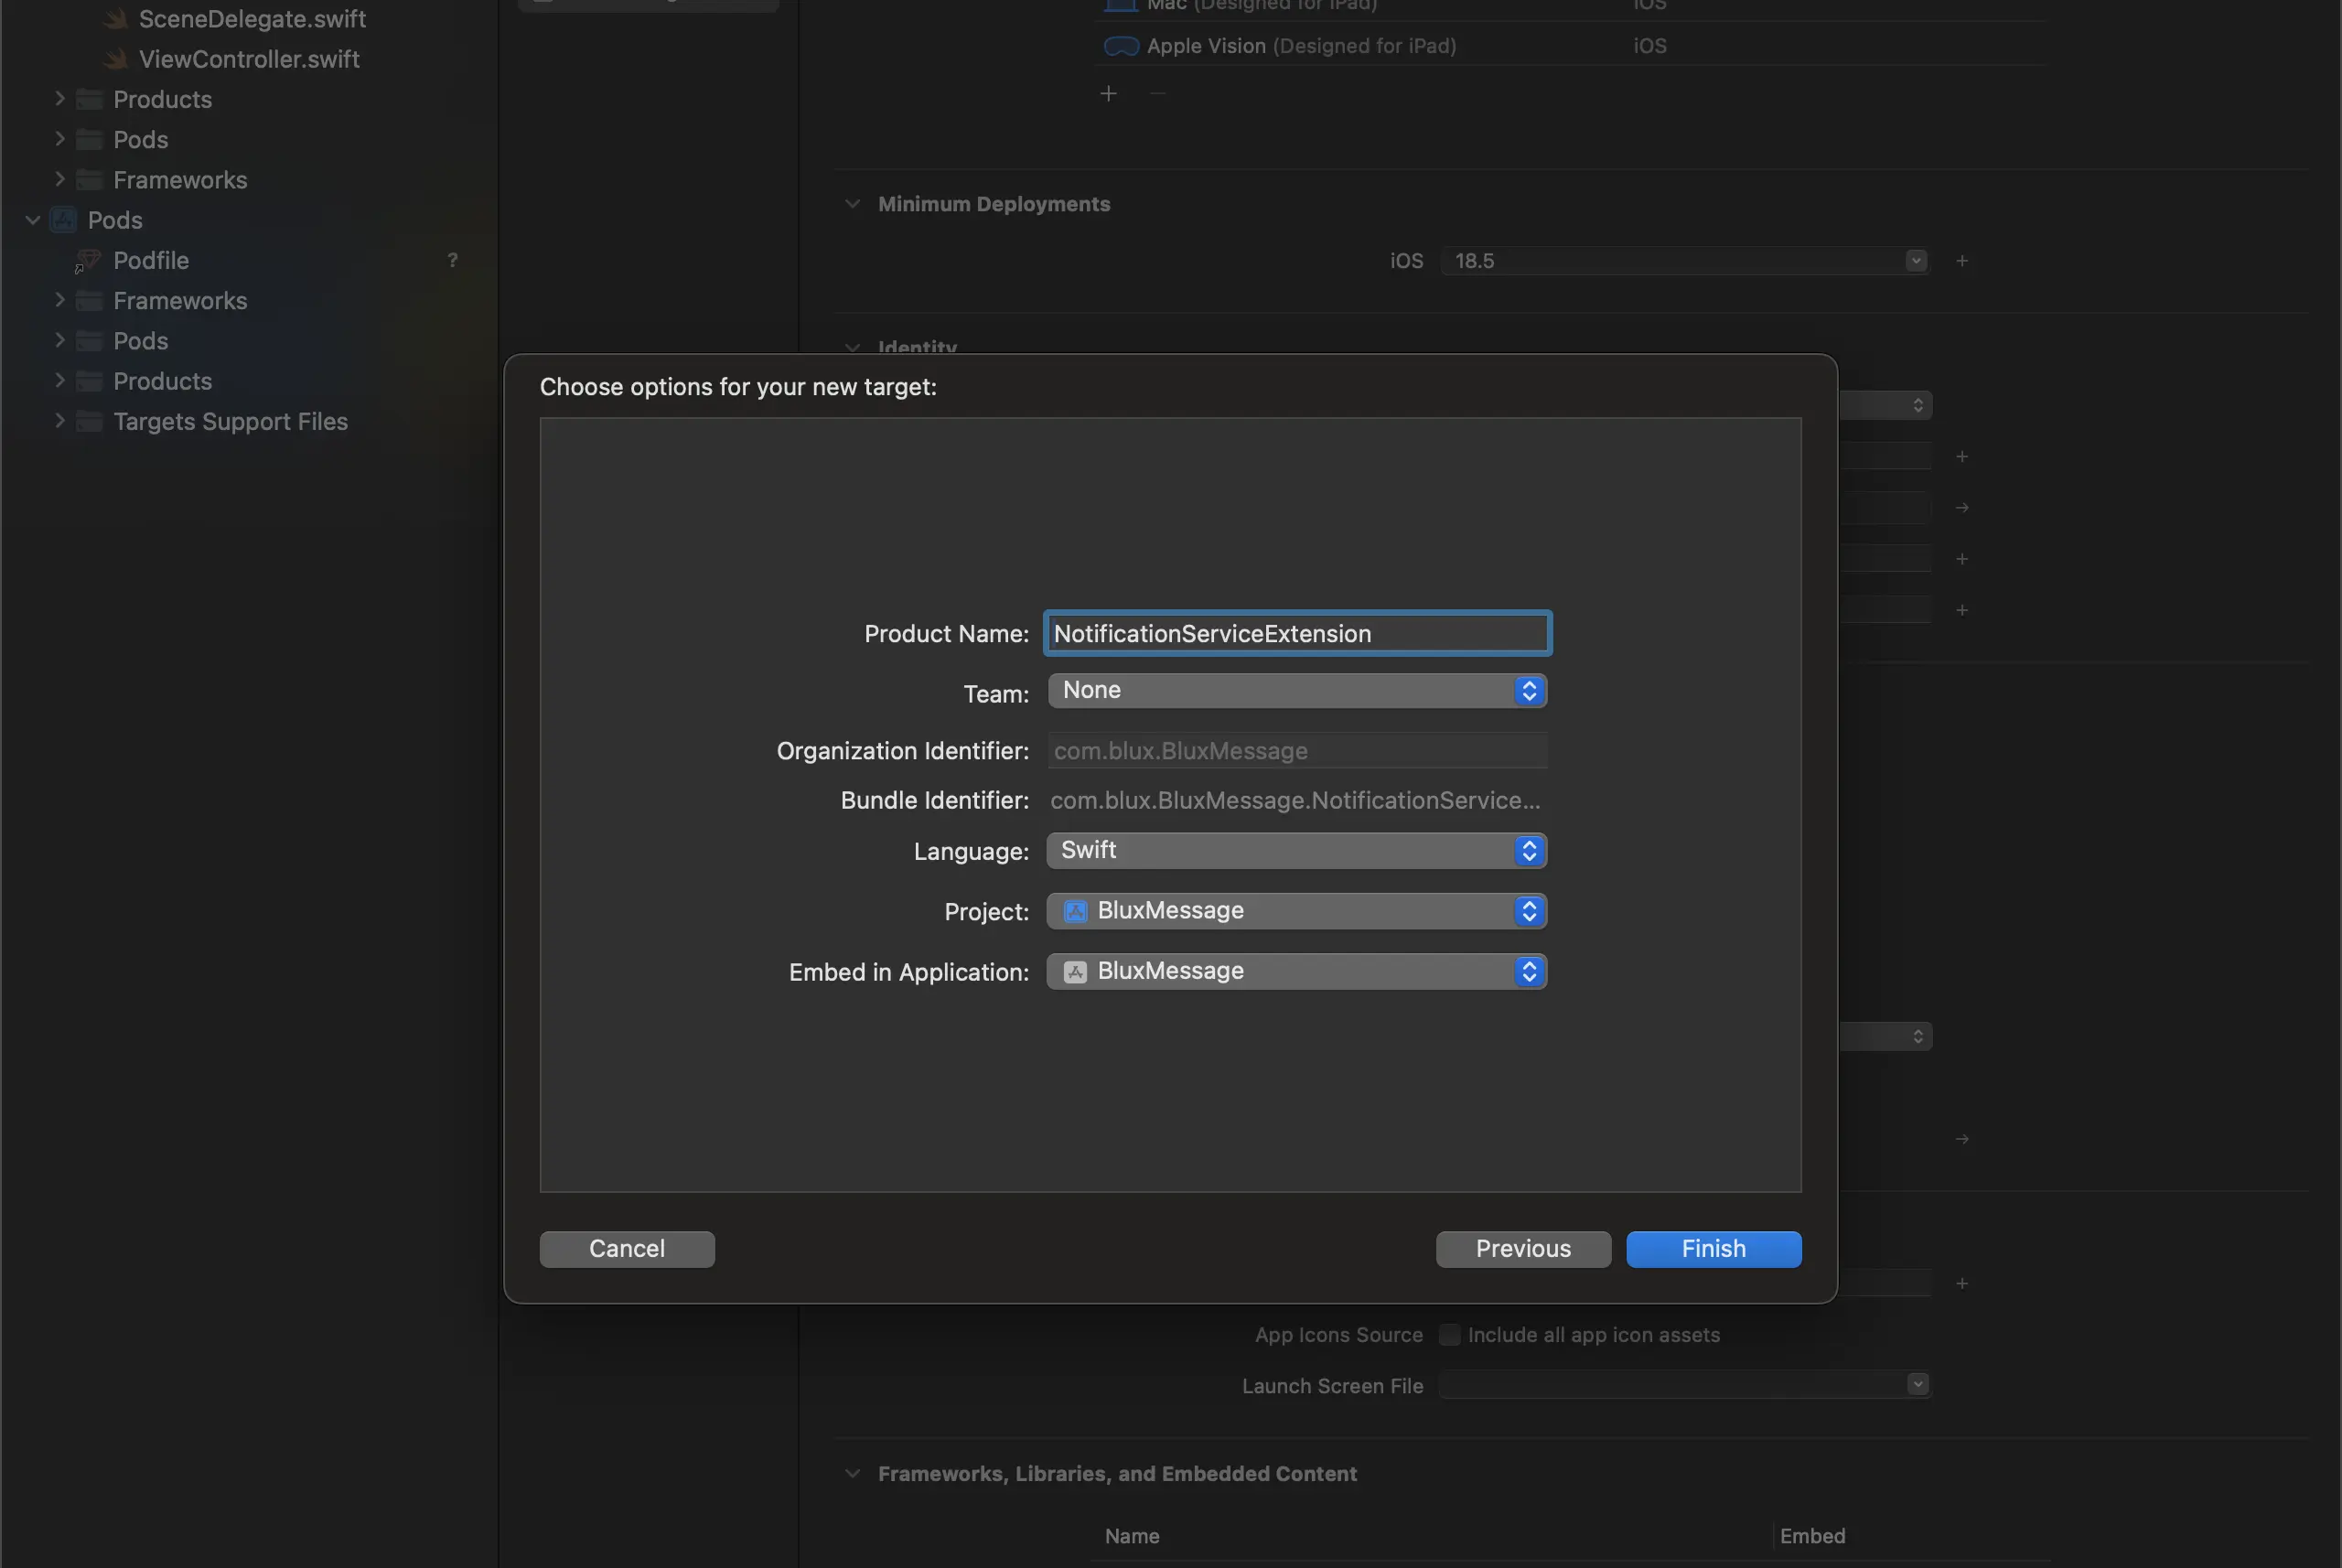
- 아래와 같이 알맞는 이름을 입력 후 Finish를 클릭하세요.
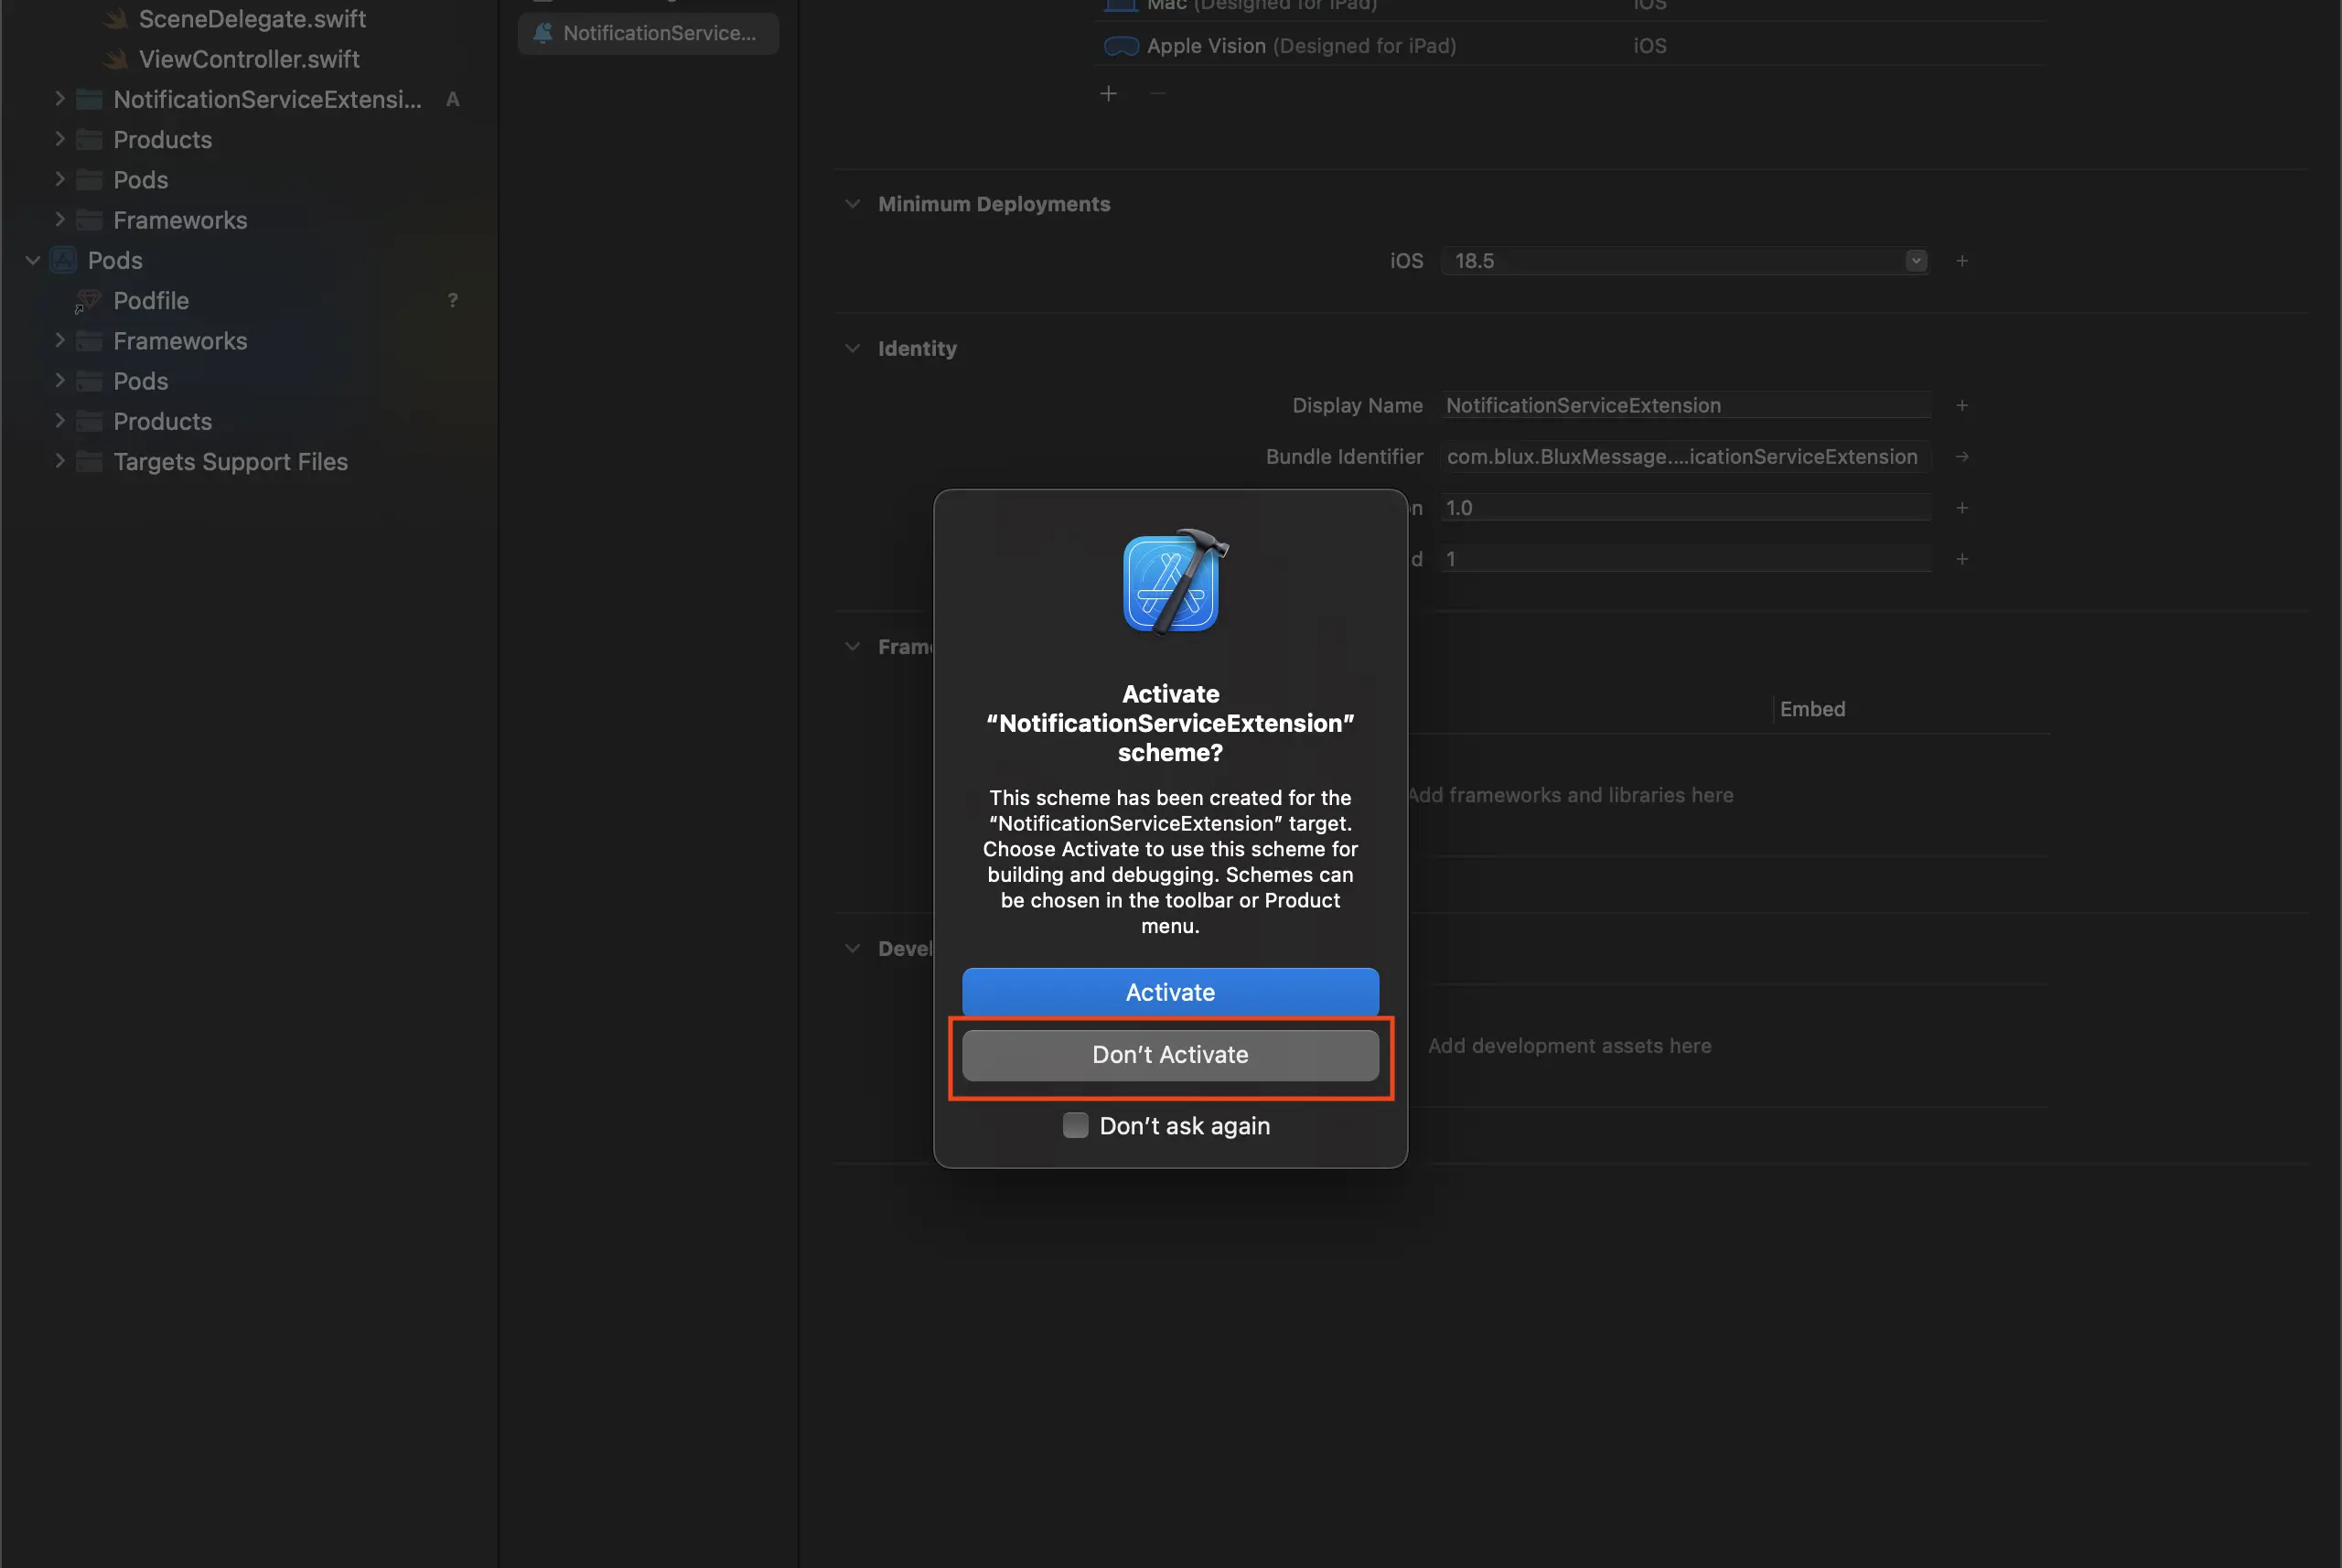
표시되는 팝업에서 Don't Activate를 클릭하여 별도의 Scheme을 활성화하지 않도록 합니다.
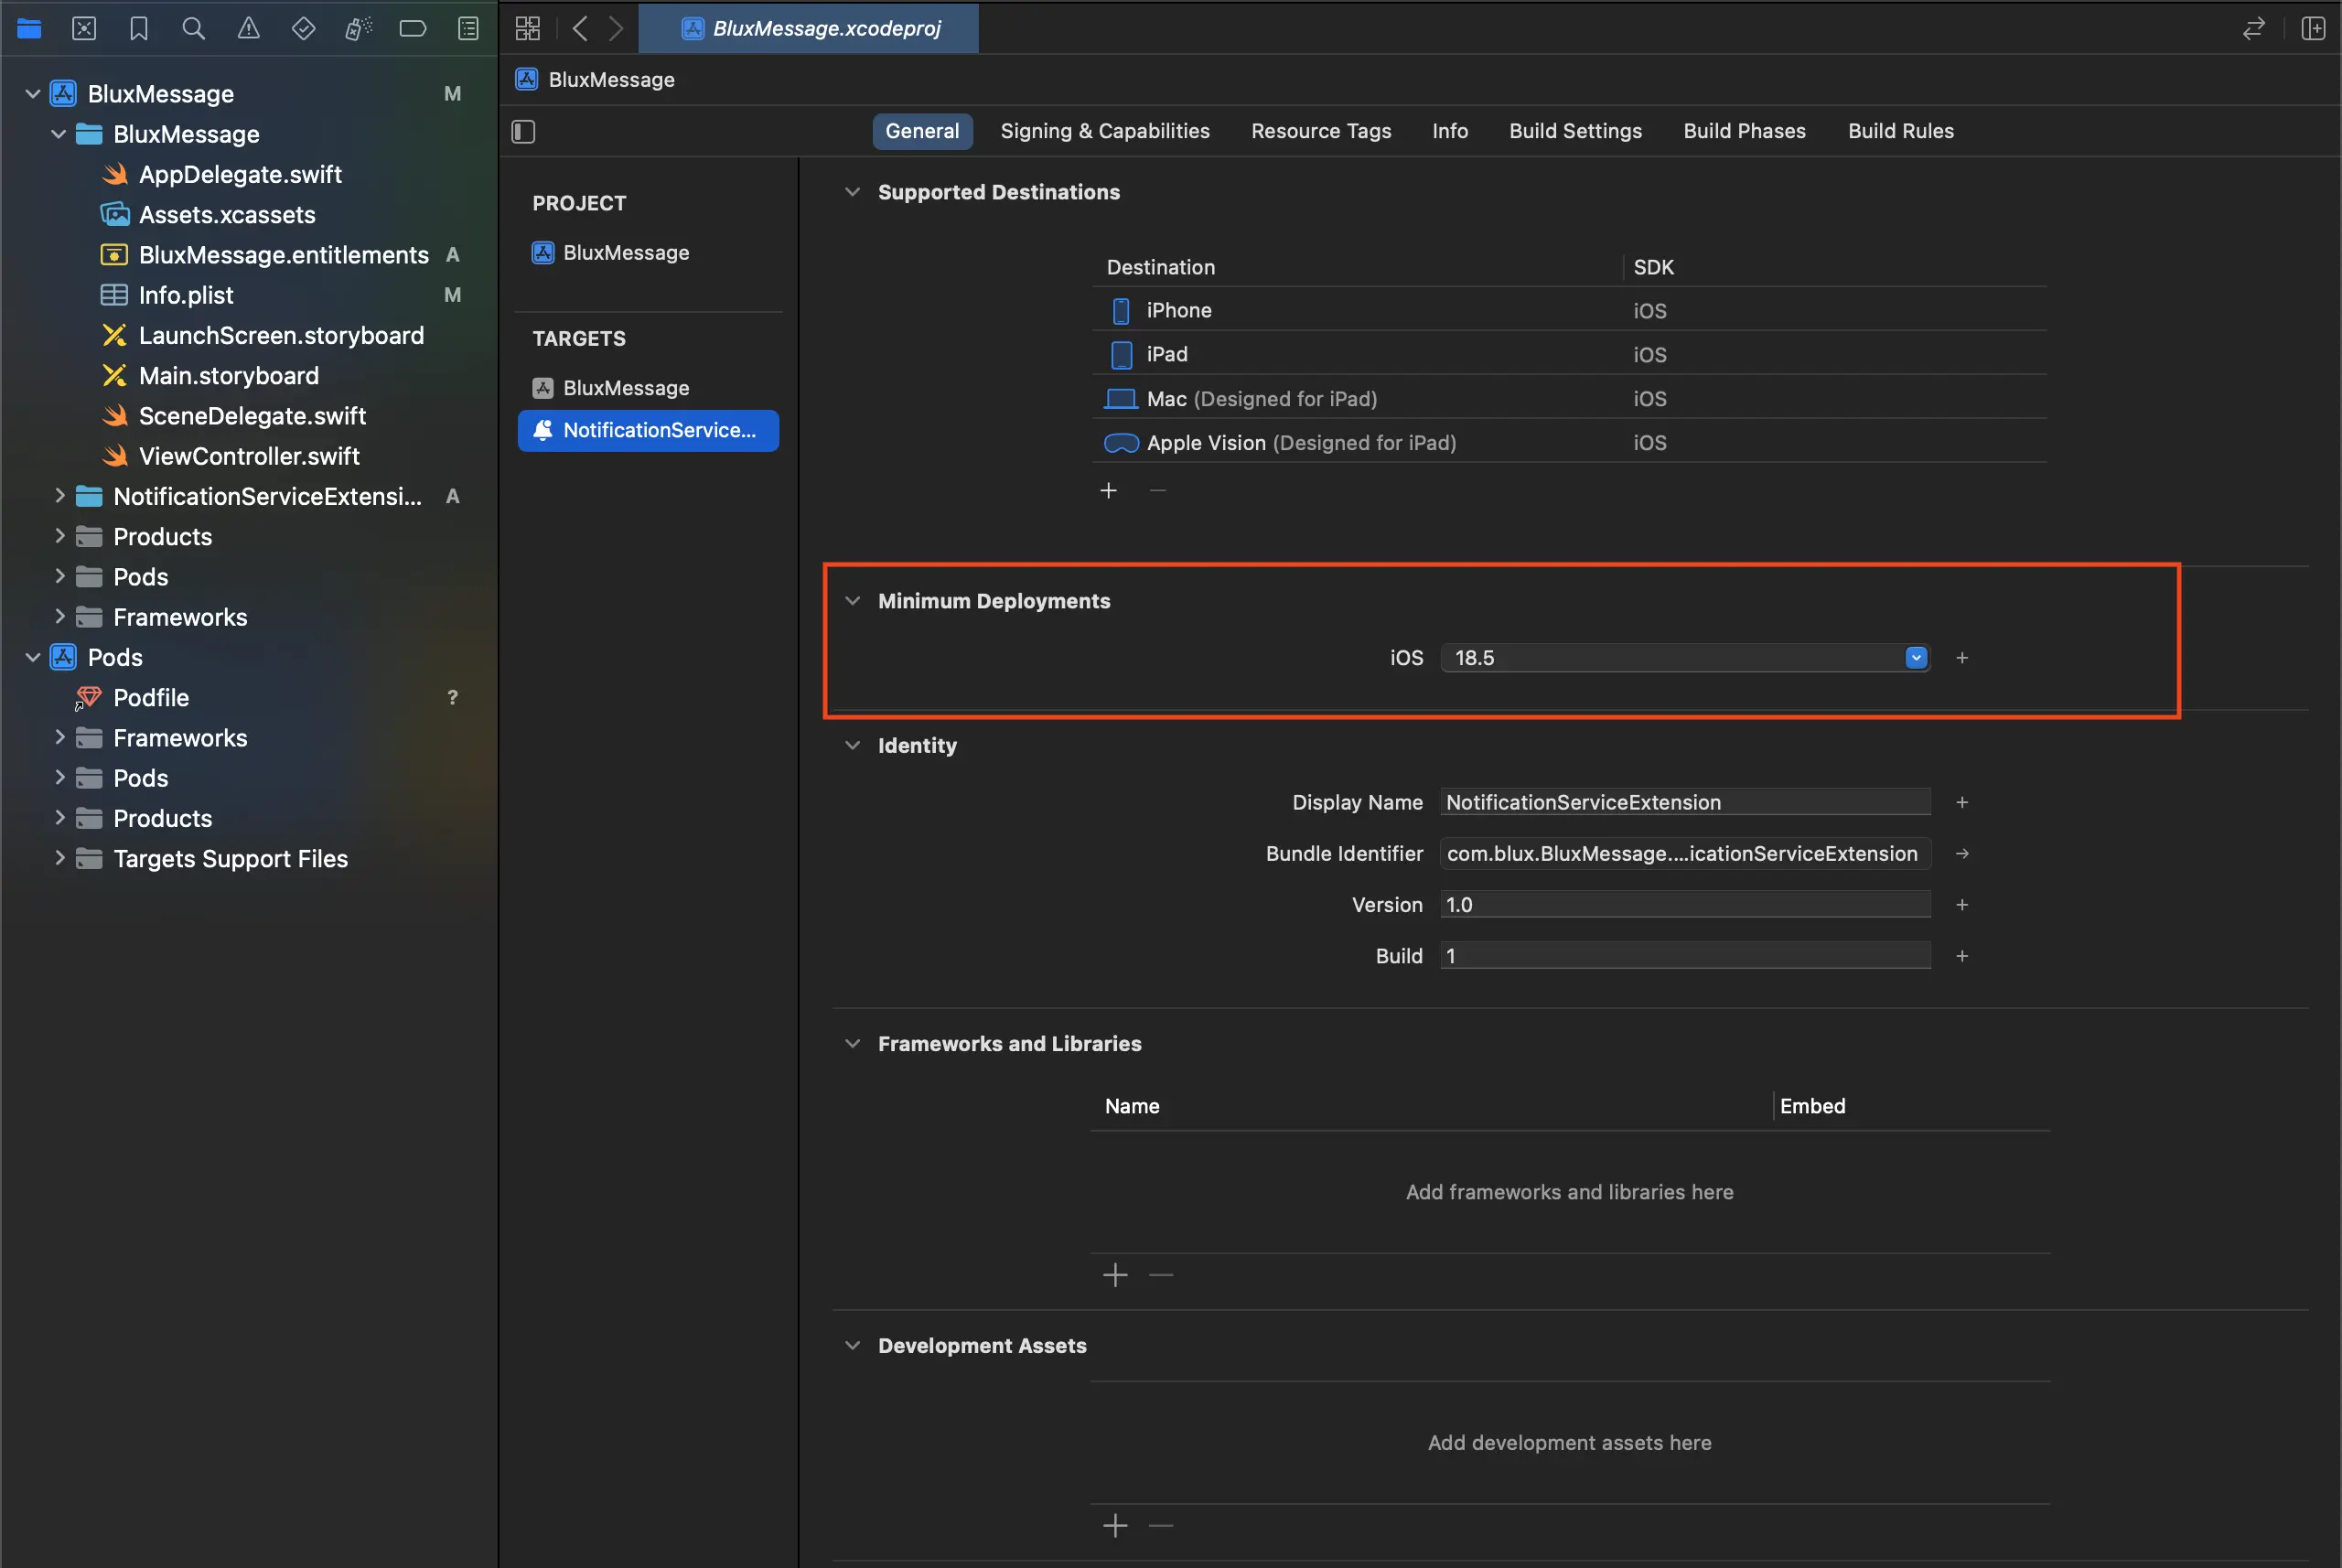
이후 Notification Service Extension Target의 Minimum Deployments 버전을 현재 사용 중인 메인 앱 Target의 버전과 동일하게 설정합니다.
App Group 설정
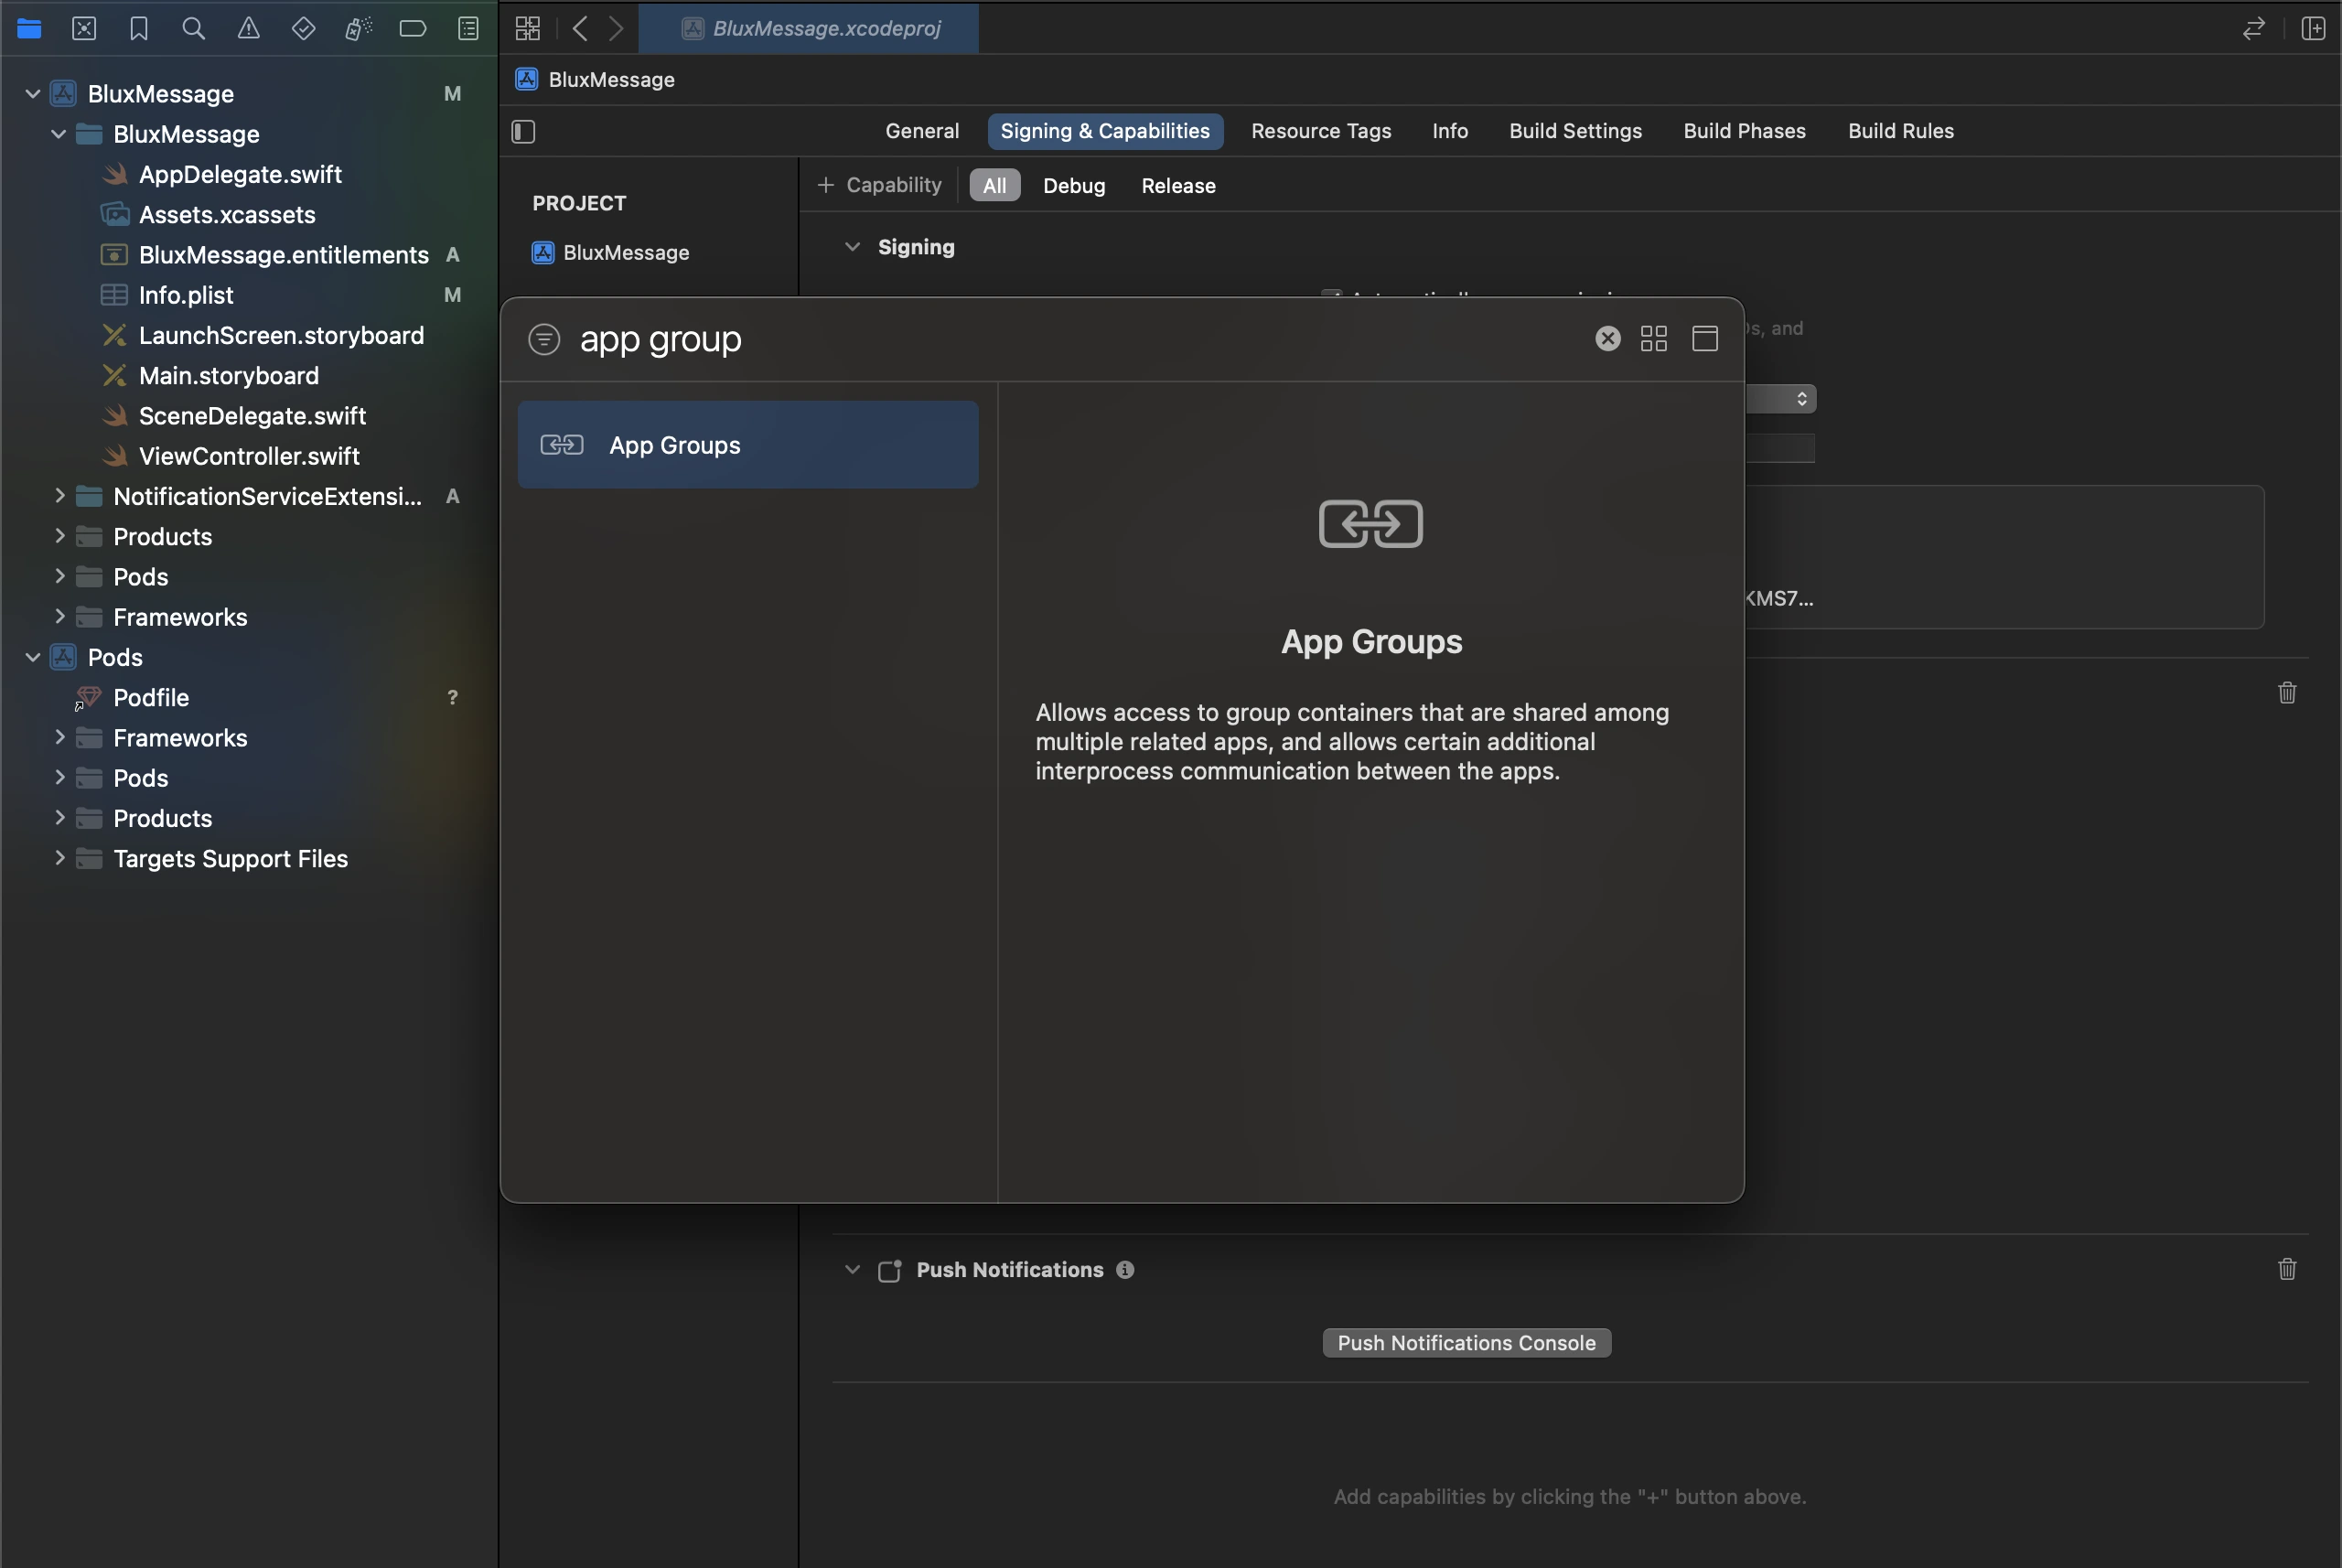
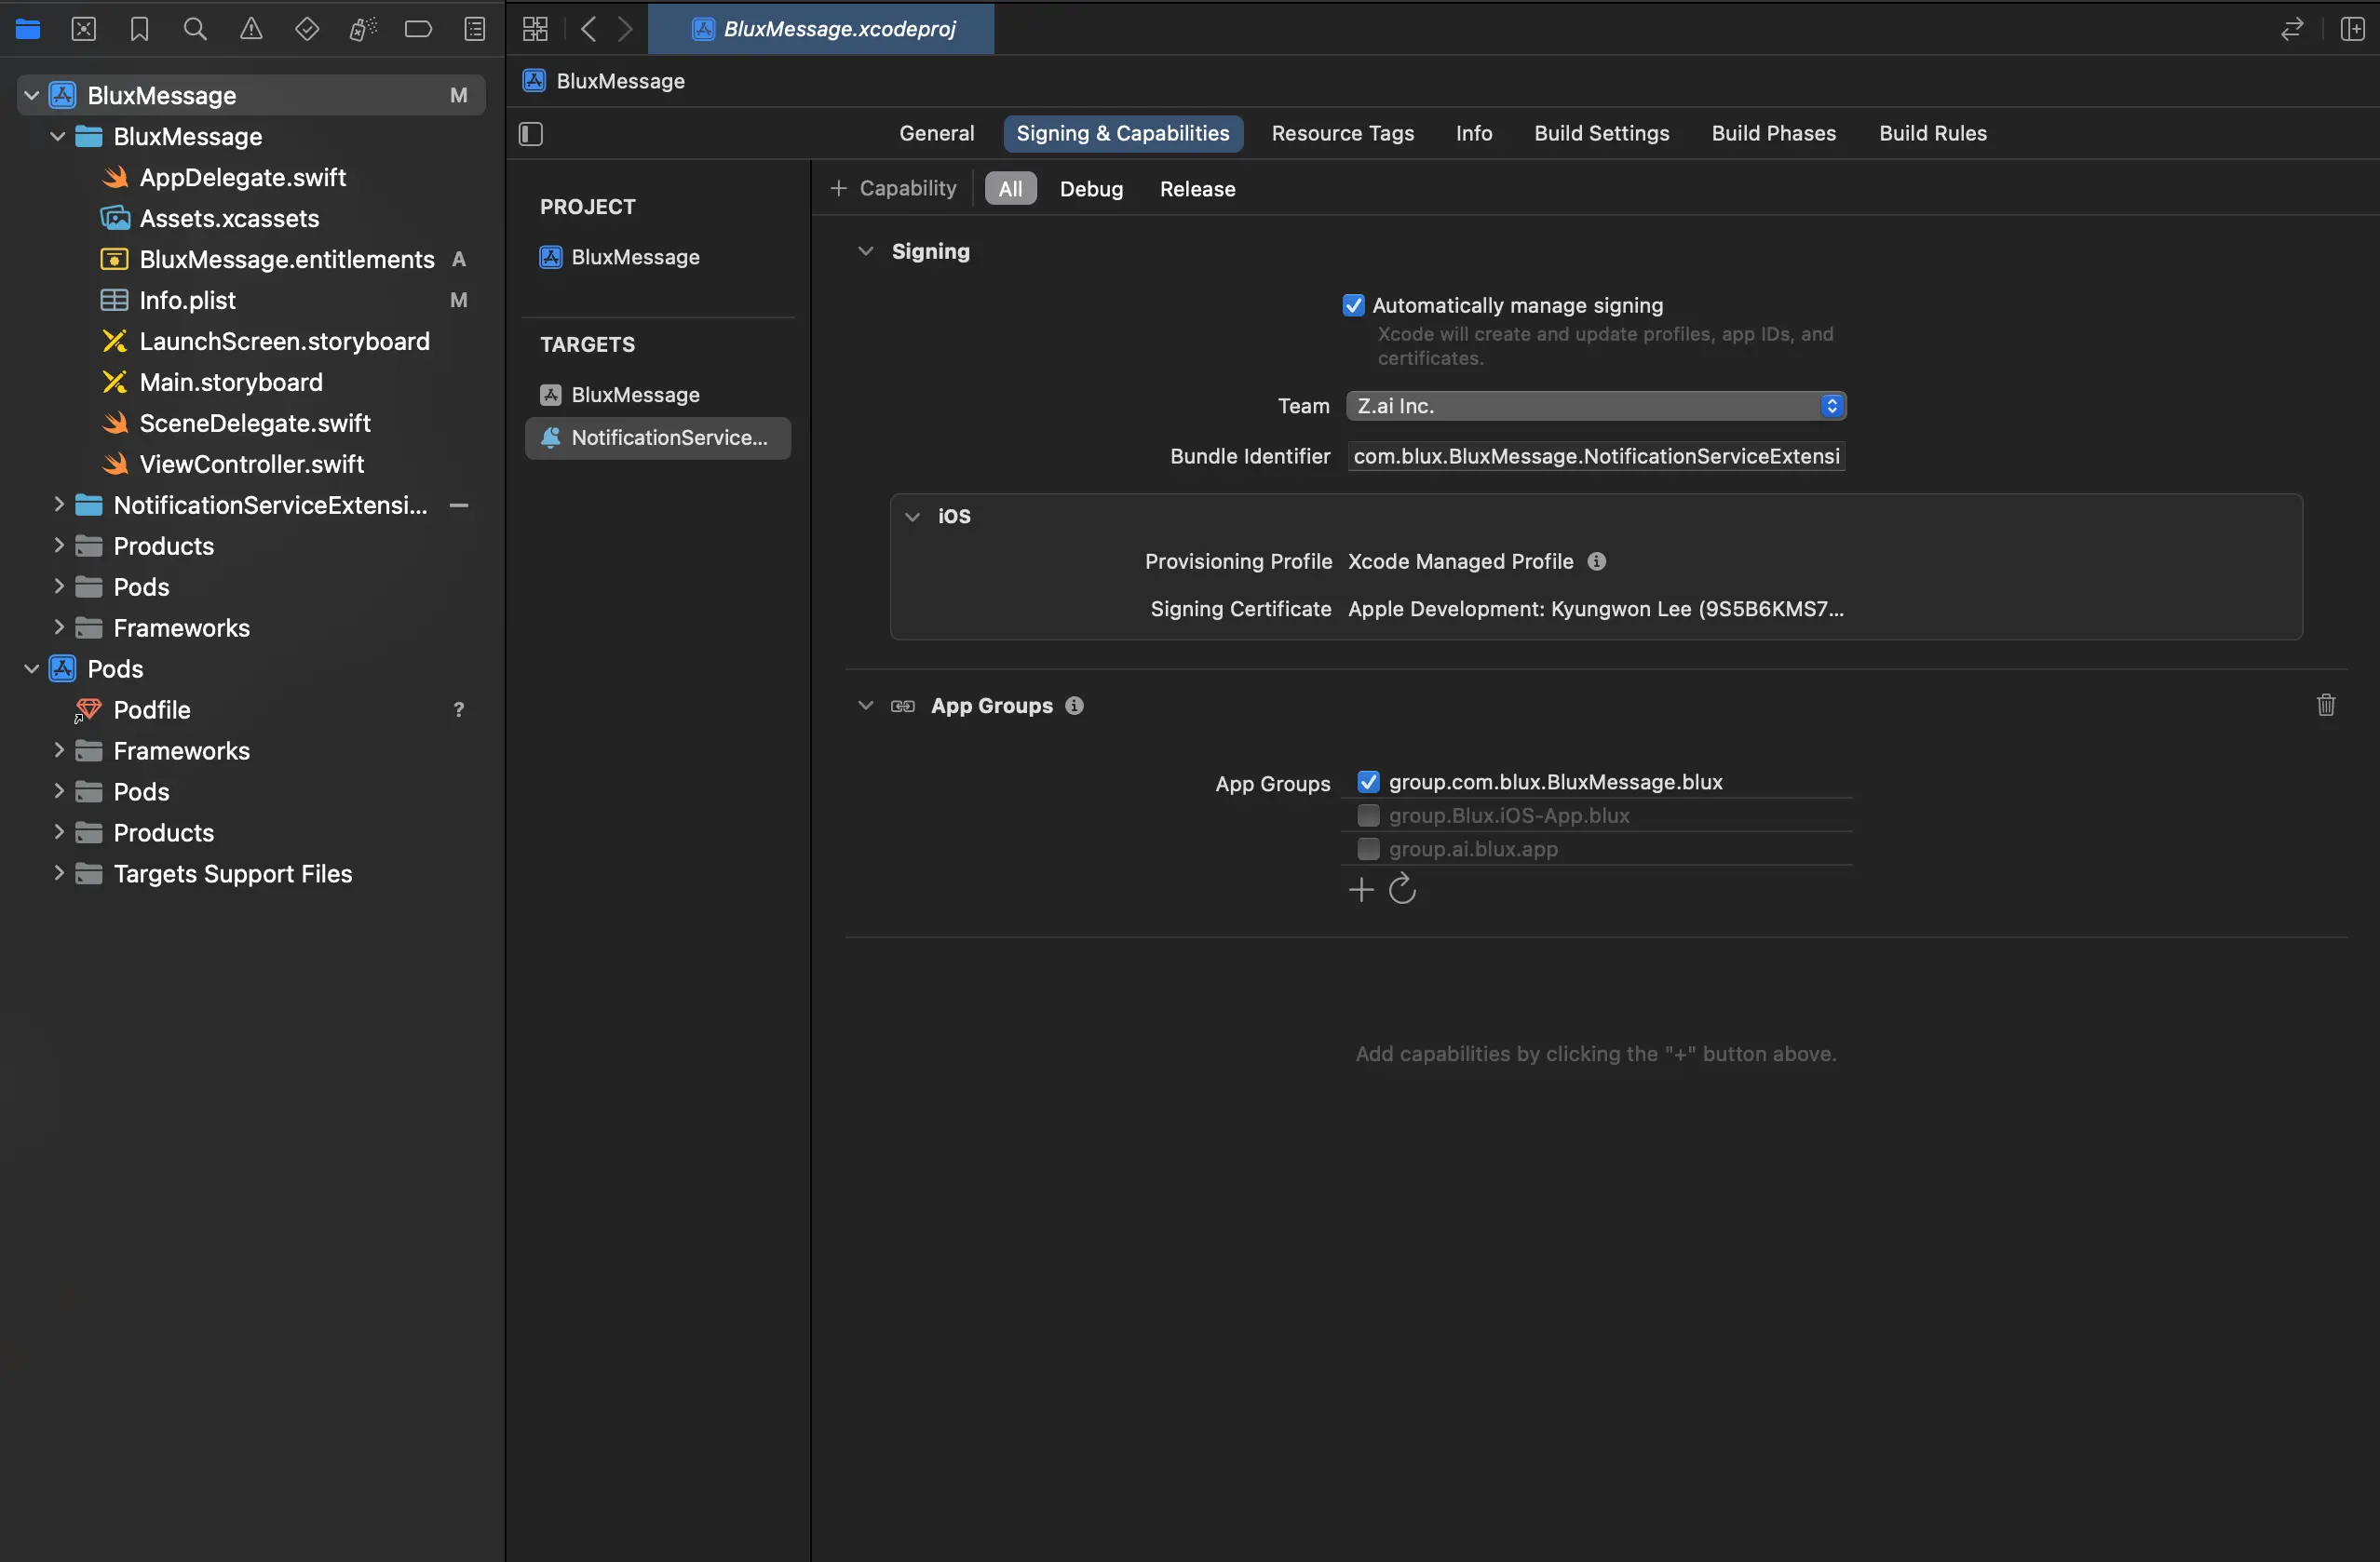
Xcode 프로젝트 설정의 Signing & Capabilities 탭에서 + Capability > App Groups를 선택하여 추가합니다.
group.[Bundle ID].blux이라는 이름의 그룹을 추가합니다. Bundle ID는 메인 앱의 Bundle Identifier와 일치해야 합니다.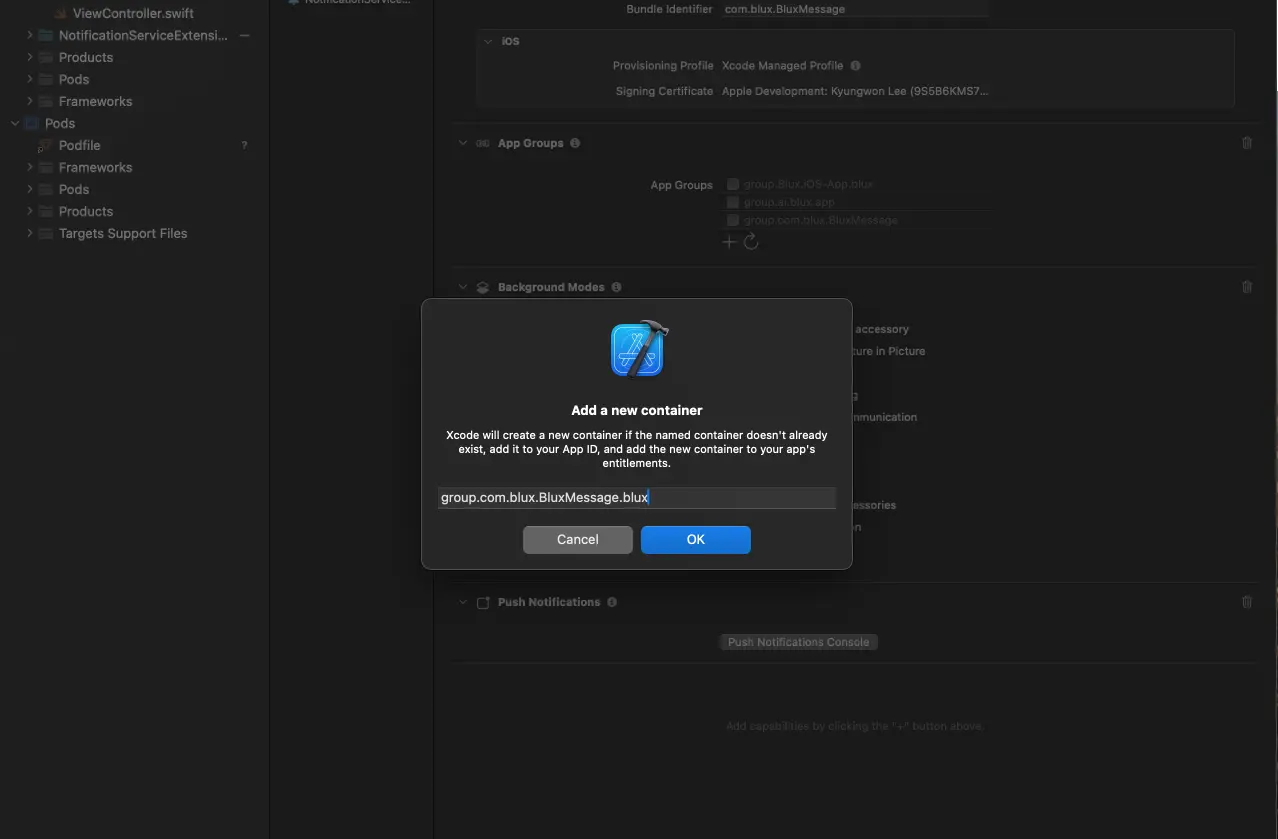
추가 후 해당 App Group을 활성화하고, 이전 단계에서 만든 Notification Service Extension에도 동일한 App Group을 추가하고 활성화합니다.
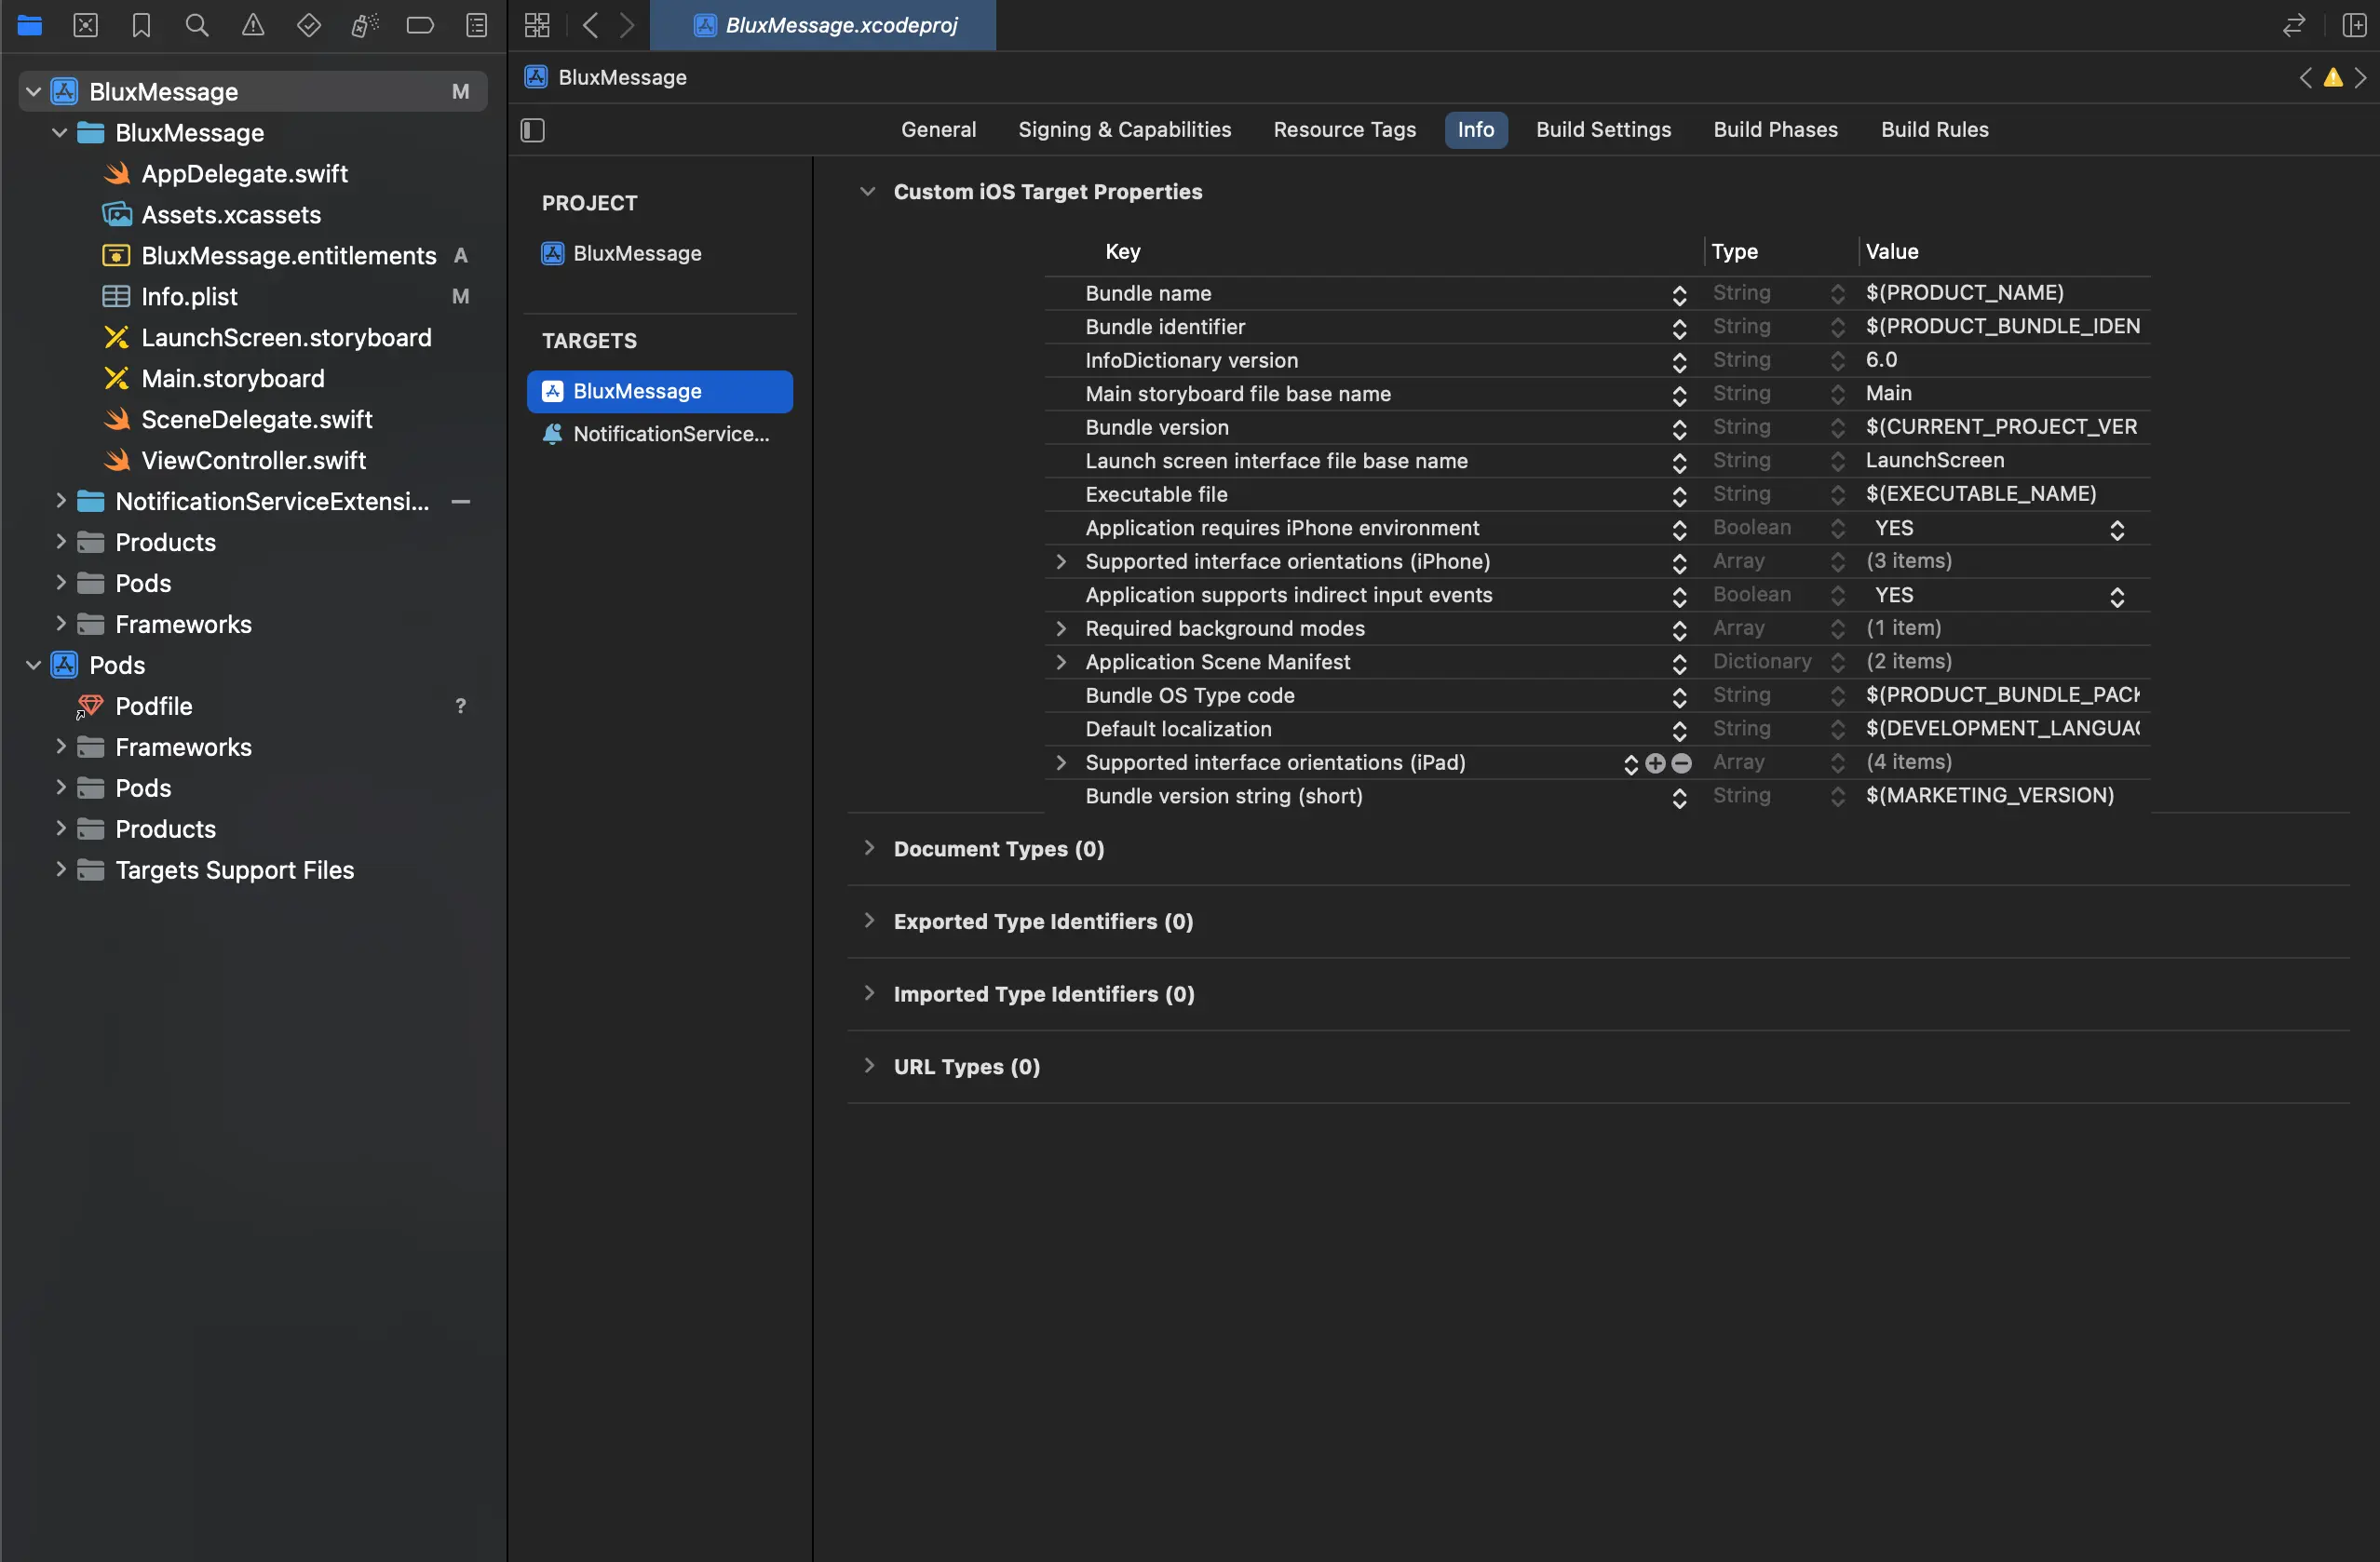
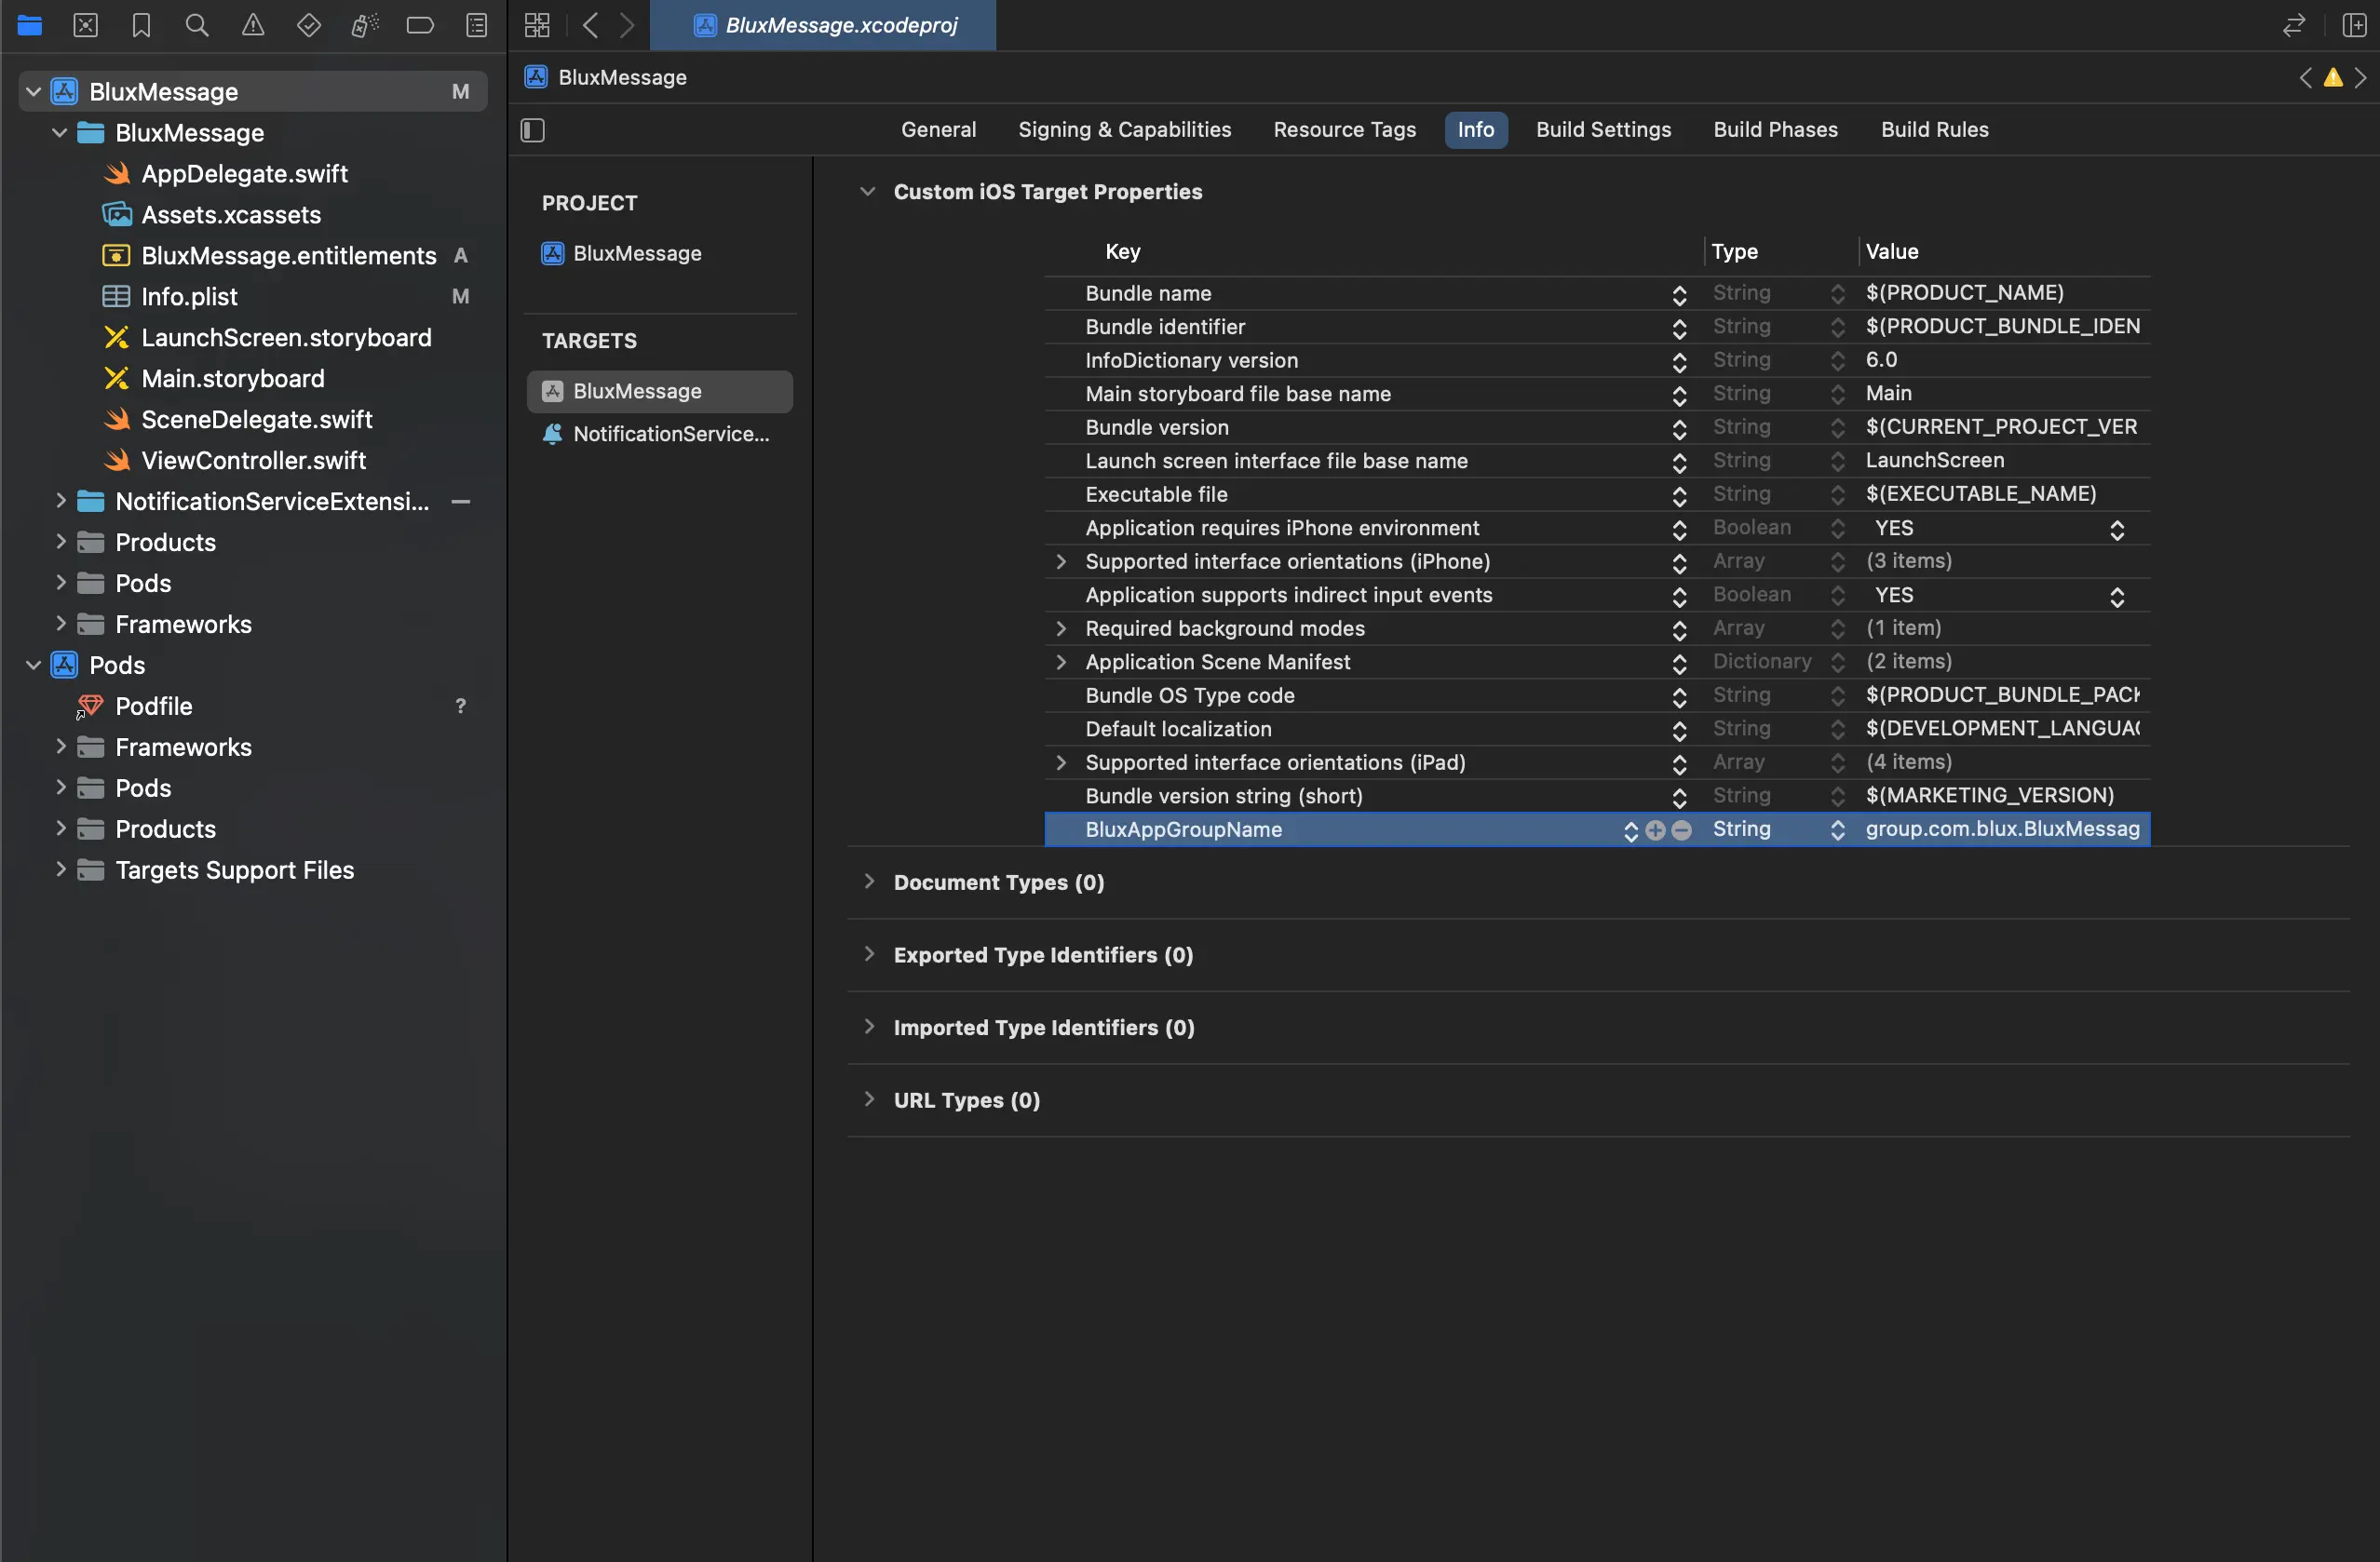
Custom iOS Target Properties 설정
Xcode 프로젝트 설정의 Info 탭에서 Custom iOS Target Properties의 마지막 열을 클릭하고 오른쪽에 표시되는 **+**를 클릭합니다.
Key는
BluxAppGroupName, Type은String, Value는 이전 단계에서 만든 App Group의 ID를 입력합니다.- App Group ID가 변경되는 경우 해당 값도 같이 변경해야 합니다.
Podfile 수정
Xcode 종료 후 ios 디렉터리 내의 Podfile을 열고 아래와 같이 target을
추가합니다.
# 앞서 생성한 Extension의 Product Name을 target 이름으로 설정합니다.
target "NotificationServiceExtension" do
  pod "BluxClient"
end
이후 pod install을 실행합니다.
블럭스 SDK 연동
AppDelegate 메서드 추가
application(:didRegisterForRemoteNotificationsWithDeviceToken:) 대응 메서드 추가
@import BluxClient;

// AppDelegate.mm
@implementation AppDelegate

// ...
- (void)application:(UIApplication *)application
didRegisterForRemoteNotificationsWithDeviceToken:(NSData *)deviceToken
{
	[[BluxAppDelegate shared] application:application
	didRegisterForRemoteNotificationsWithDeviceToken:deviceToken];
}
// ...

@end
UNUserNotificationCenterDelegate 메서드 추가
-
AppDelegate에 UNUserNotificationCenterDelegate 지정
-
userNotificationCenter(:willPresent:withCompletionHandler:) 대응 메서드 추가
-
대응 메서드 추가
AppDelegate.h#import <UserNotifications/UserNotifications.h>
@interface AppDelegate : RCTAppDelegate <UNUserNotificationCenterDelegate>
@endAppDelegate.mm@implementation AppDelegate
- (BOOL)application:(UIApplication *)application didFinishLaunchingWithOptions:
(NSDictionary *)launchOptions
{
// 1. AppDelegate에 UNUserNotificationCenterDelegate 지정
[[UNUserNotificationCenter currentNotificationCenter] setDelegate: self];
}
// 2. userNotificationCenter(:willPresent:withCompletionHandler:) 대응 메서드 추가
- (void)userNotificationCenter:(UNUserNotificationCenter *)center
willPresentNotification:(UNNotification *)notification
withCompletionHandler:(void (^)(UNNotificationPresentationOptions options))completionHandler
{
[[BluxNotificationCenter shared] userNotificationCenter:center
willPresentNotification:notification
withCompletionHandler:completionHandler];
}
// 3. 대응 메서드 추가
- (void)userNotificationCenter:(UNUserNotificationCenter *)center
didReceiveNotificationResponse:(UNNotificationResponse *)response
withCompletionHandler:(void(^)(void))completionHandler
{
[[BluxNotificationCenter shared] userNotificationCenter:center
didReceiveNotificationResponse:response
withCompletionHandler:completionHandler];
}
@end
UNNotificationServiceExtension 메서드 추가
-
didReceive(:withContentHandler:) 대응 메서드 추가
-
serviceExtensionTimeWillExpire() 대응 메서드 추가
NotificationService.swift
import UserNotifications
import BluxClient

class NotificationService: UNNotificationServiceExtension {

	override func didReceive(_ request: UNNotificationRequest, withContentHandler
	contentHandler: @escaping (UNNotificationContent) -> Void) {
	// 1. didReceive(:withContentHandler:) 대응 메서드 추가
	// 블럭스에서 발송한 푸시는 블럭스의 메서드만 동작하도록 분기 처리합니다.

		if BluxNotificationServiceExtensionHelper.shared.isBluxNotification(request) {
			BluxNotificationServiceExtensionHelper.shared.didReceive(request, withContentHandler: contentHandler)
		}
	}

	override func serviceExtensionTimeWillExpire() {
		// ✅ 블럭스 처리 타임아웃 콜백
		BluxNotificationServiceExtensionHelper.shared.serviceExtensionTimeWillExpire()
	}
}
SDK 설치
아래 명령어로 블럭스 React Native SDK를 설치합니다.
npm install @blux.ai/react-native

yarn add @blux.ai/react-native

pnpm install @blux.ai/react-native
BluxClient 초기화
initialize()
블럭스 React Native SDK의 모든 메서드는 BluxClient 객체의 static 메서드입니다. initialize()를 호출해서 SDK를 초기화하세요. 내 서비스의 애플리케이션 아이디와 API 키 정보는 연동 키 확인하기 에서 자세히 확인하세요.
* 모든 메서드는 SDK가 초기화 된 이후에 호출해야 �합니다.
BluxClient.initialize(
	bluxApplicationId: "BLUX_APPLICATION_ID",
	bluxAPIKey: "BLUX_API_KEY",
	requestPermissionOnLaunch: true,
);
파라미터
bluxApplicationId필수String
고객님의 서비스를 식별하는 고유 아이디입니다.
bluxAPIKey필수String
블럭스에서 발급하는 API 키입니다.
requestPermissionOnLaunch필수boolean
true라면, 앱 실행 시 필요한 권한을 자동으로 요청합니다.
응답
Promise<void>유저
signIn()
유저 로그인을 요청합니다. signIn()을 호출하지 않으면 블럭스 SDK는 유저를 식별할 수 없어요. 아래의 경우에 반드시 호출하세요.
① 회원 유저가 자동 로그인 한 시점
② 비회원 유저가 로그인하여 회원 유저로 식별되는 시점
BluxClient.signIn({ userId: 'USER_ID' });

  // 자동 로그인이 구현된 경우
  await BluxClient.initialize(
  	bluxApplicationId: "BLUX_APPLICATION_ID",
  	bluxAPIKey: "BLUX_API_KEY"
  );
  BluxClient.signIn({ userId: "USER_ID" });
파라미터
userId필수string
유저를 식별하는 고유 아이디입니다.
응답
Promise<void>signOut()
유저 로그아웃을 요청합니다. 회원 유저가 로그아웃하는 시점에 호출하세요.
BluxClient.signOut();
응답
Promise<void>setUserProperties()
유저의 전화번호, 이메일 주소, 광고 수신 동의 여부 등을 설정합니다.
BluxClient.setUserProperties({
	userProperties: {
		phone_number: "01012345678",
		email_address: "test@blux.ai",
		marketing_notification_consent: true,
	}
});
파라미터
userProperties필수Record<string, any>
유저의 기본 정보입니다.
phone_numberstring
유저의 전화번호입니다. 블럭스의 문자/카카오톡 발송에 사용되고 있어요.
-없이 숫자로만 구성된 문자열입니다.email_addressstring
유저의 이메일 주소입니다. 블럭스의 이메일 발송에 사용되고 있어요.
agenumber
유저의 나이입니다.
genderstring
유저의 성별입니다.
male,female중 하나를 입력하세요.marketing_notification_consentboolean
광고 수신 전역 동의 설정입니다. 전역 동의 또는 채널별 동의 둘 중 하나라도
false면 해당 채널의 광고 수신은 거부됩니다. 둘 다 미설정이어도 해당 채널은 거부됩니다.marketing_notification_sms_consentboolean
광고 문자 수신 동의 여부입니다.
marketing_notification_email_consentboolean
광고 이메일 수신 동의 여부입니다.
marketing_notification_push_consentboolean
광고 푸시 알림 수신 동의 여부입니다.
marketing_notification_kakao_consentboolean
광고 카카오톡 수신 동의 여부입니다.
응답
Promise<void>setCustomUserProperties()
setUserProperties()로 설정하는 기본 정보 이외의 추가 정보를 설정합니다.
BluxClient.setCustomUserProperties({
	customUserProperties: {
		"membership_level": "GOLD",
		"available_points": 12000,
		"is_active": true,
		"last_login_date": "2025-06-17T11:15:00.123+09:00",
	}
});
파라미터
customUserProperties필수Record<string, any>
유저의 추가 정보입니다. 예를 들어, 회원 등급, 잔여 포인트, 활성 여부, 최근 로그인 일시 등을 설정할 수 있습니다. 블럭스의 유저 세그멘테이션에 사용되고 있어요.
응답
Promise<void>이벤트
Event 객체
유저의 행동 데이터를 담고 있는 객체입니다. 행동의 종류, 정보, 발생 시간 등을 자세히 알 수 있습니다.
기본 이벤트
기본 이벤트는 블럭스가 미리 정의해 둔 이벤트 객체입니다. 자주 쓰이는 장바구니 담기, 좋아요 누르기, 상세페이지 진입하기 등의 이벤트��를 포함합니다.
AddProductDetailViewEvent
유저가 상품의 상세 정보를 탐색한 순간이에요. 예를 들어, 유저가 상품의 상세페이지에 진입한 순간을 의미해요.
const addProductDetailViewEvent = new AddProductDetailViewEvent({
	item_id: "ITEM_ID",
	custom_event_properties: {
		brandName: "Nike",
		categoryName: "Shoes",
	},
});
객체 상세
item_id필수string
상품을 식별하는 고유 아이디입니다. 연동 시 사용한 상품 아이디를 입력하세요.
custom_event_propertiesMap<String, Object>
이벤트 추가 속성입니다. 위 속성 이외의 속성을 추가하고 싶다면 이 필드를 사용하세요.
AddCartaddEvent
유저가 상품에 대한 강한 선호를 표현한 순간이에요. 예를 들어, 유저가 상품을 장바구니에 담은 순간을 의미해요.
const addCartaddEvent = new AddCartaddEvent({
	item_id: "ITEM_ID",
	custom_event_properties: {
		brandName: "Nike",
		addedFrom: "product_detail",
	},
});
객체 상세
item_id필수string
상품을 식별하는 고유 아이디입니다. 연동 시 사용한 상품 아이디를 입력하세요.
custom_event_propertiesMap<String, Object>
이벤트 추가 속성입니다. 위 속성 이외의 속성을 추가하고 싶다면 이 필드를 사용하세요.
AddPurchaseEvent
유저가 상품을 구매하여 비용을 지불한 순간이에요.
const addPurchaseEvent = new AddPurchaseEvent({
	item_id: "ITEM_ID",
	price: 15000.0,
});
객체 상세
item_id필수string
상품을 식별하는 고유 아이디입니다. 연동 시 사용한 상품 아이디를 입력하세요.
price필수number
유저가 지불한 총 비용입니다.
AddLikeEvent
유저가 상품에 대한 약한 선호를 표현한 순간이에요. 예를 들어, 유저가 상품에 좋아요 버튼을 누른 순간을 의미해요.
const addLikeEvent = new AddLikeEvent({
	item_id: "ITEM_ID",
	custom_event_properties: {
		brandName: "Nike",
		collectionName: "Spring 2026",
	},
});
객체 상세
item_id필수string
상품을 식별하는 고유 아이디입니다. 연동 시 사용한 상품 아이디를 입력하세요.
custom_event_propertiesMap<String, Object>
이벤트 추가 속성입니다. 위 속성 이외의 속성을 추가하고 싶다면 이 필드를 사용하세요.
AddRateEvent
유저가 상품에 대한 선호를 구체적인 숫자로 표현한 순간이에요. 예를 들어, 유저가 상품에 별점을 남기는 순간을 의미해요.
const addRateEvent = new AddRateEvent({
	item_id: "ITEM_ID",
	rating: 4.5,
	custom_event_properties: {
		brandName: "Nike",
		reviewSource: "in_app",
	},
});
객체 상세
item_id필수string
상품을 식별하는 고유 아이디입니다. 연동 시 사용한 상품 아이디를 입력하세요.
rating필수number
상품에 대한 유저의 평가 점수입니다.
custom_event_propertiesMap<String, Object>
이벤트 추가 속성입니다. 위 속성 이외의 속성을 추가하고 싶다면 이 필드를 사용하세요.
커스텀 이벤트
커스텀 이벤트는 고객님이 직접 정의할 수 있는 이벤트 객체입니다. 기본 이벤트가 아닌 행동 데이터를 수집해야 할 때 이용하세요
* 커스텀 이벤트 사용이 필요하다면, 블럭스에 문의하세요.
const addCustomEvent = new AddCustomEvent({
  event_type: "CUSTOM_EVENT",
  custom_event_properties: {
    custom_key1: "any_value",
    custom_key2: true,
    custom_key3: null,
    custom_key4: 3,
  },
});
객체 상세
custom_event_propertiesrecord<string, any>
이벤트 추가 속성입니다.
sendEvent()
유저의 행동 데이터를 블럭스 데이터베이스에 저장합니다.
BluxClient.sendEvent(new AddCustomEvent({ ... }));

  BluxClient.sendEvent([
  	new AddCustomEvent({ ... }),
  	new AddCustomEvent({ ... }),
  	...
  ]);
파라미터
응답
Promise<void>알림
푸시 수신 인터셉터 (네이티브 레이어)
푸시 수신 직후 페이로드를 가로채려면 네이티브 레이어에서 인터셉터를 등록해야 합니다. 백그라운드/킬 상태�에서는 React Native JS 엔진이 잠들어 있어 JS 핸들러가 호출되지 않기 때문에, Android는 Application.onCreate에서, iOS는 Notification Service Extension에서 직접 등록합니다.
Android
* Android SDK 0.5.10 이상에서 지원됩니다.
React Native 프로젝트의 기존 MainApplication.kt 의 onCreate 안에 등록하세요.
import android.app.Application
import com.blux_android_sdk.BluxClient
import com.facebook.react.ReactApplication

class MainApplication : Application(), ReactApplication {
    // ... 기존 ReactNativeHost 설정 ...

    override fun onCreate() {
        super.onCreate()
        // ... 기존 SoLoader.init 등 RN 초기화 코드 ...

        BluxClient.setNotificationInterceptor { context, notification, builder ->
            builder.setContentText("[Blux] ${notification.body}")
            // 호스트 앱의 자체 알림함에 notification 적재
        }
    }
}
iOS
* iOS SDK 0.6.2 이상에서 지원됩니다.
App Group 설정은 Xcode 설정 단계를 참고하세요.
import UserNotifications
import BluxClient

class NotificationService: UNNotificationServiceExtension {
    override func didReceive(_ request: UNNotificationRequest, withContentHandler contentHandler: @escaping (UNNotificationContent) -> Void) {
        if BluxNotificationServiceExtensionHelper.shared.isBluxNotification(request) {
            BluxNotificationServiceExtensionHelper.shared.didReceive(request, withContentHandler: contentHandler) { request, content, notification in
                content.body = "[Blux] " + content.body
                // 호스트 앱의 자체 알림함에 notification 적재
            }
        } else {
            // 다른 푸시 SDK가 있다면 해당 SDK의 NSE 처리, 없다면 원본 콘텐츠를 그대로 전달
            contentHandler(request.content)
        }
    }

    override func serviceExtensionTimeWillExpire() {
        BluxNotificationServiceExtensionHelper.shared.serviceExtensionTimeWillExpire()
    }
}
setNotificationForegroundWillDisplayHandler()
* React Native SDK 0.2.13 이상에서 지원됩니다.
앱이 포그라운드인 상태에서 푸시를 수신했을 때, SDK가 시스템 알림을 표시하기 직전에 호출되는 핸들러를 등록합니다. 핸들러 안에서 event.display()를 명시적으로 호출해야 시스템 알림이 표시되므로, 포그라운드에서는 시스템 알림을 띄우지 않고 인앱 UI로만 표시하는 등의 제어가 가능합니다.
포그라운드 푸시 수신 시 표시 직전에 호출되는 핸들러를 등록합니다.
BluxClient.setNotificationForegroundWillDisplayHandler(async (event) => {
await event.display();
});
파라미터
handler필수(event: NotificationForegroundWillDisplayEvent) => void
포그라운드 푸시 수신 시 실행되는 핸들러입니다. event.display()를 호출하지 않으면 시스템 알림이 표시되지 않습니다.
응답
Promise<void>setNotificationClickedHandler()
* React Native SDK 0.2.13 이상에서 지원됩니다.
유저가 푸시 알림을 클릭했을 때 호출되는 핸들러를 등록합니다. 알림함 read 처리, 클릭 추적, 호스트 앱 자체 화면 전환 등에 사용합니다.
푸시 알림 클릭 시 호출되는 핸들러를 등록합니다.
BluxClient.setNotificationClickedHandler((notification) => {
// notification.url, notification.data 등으로 호스트 앱 화면 전환 / read 처리
});
파라미터
handler필수(notification: BluxNotification) => void
푸시 알림 클릭 시 실행되는 핸들러입니다. 클릭된 푸시의 BluxNotification 객체가 전달됩니다.
응답
Promise<void>setNotificationUrlOpenOptions()
* React Native SDK 0.2.13 이상에서 지원됩니다.
푸시 알림 클릭 시 알림에 실린 http/https URL을 SDK가 어떻게 열지 정합니다. 인앱용 setInAppUrlOpenOptions와 동일한 HttpUrlOpenTarget을 사용하지만 별도 저장 키로 분리되어 있어 알림과 인앱 정책을 독립적으로 설정할 수 있습니다.
푸시 알림 URL 오픈 동작을 설정합니다.
await BluxClient.setNotificationUrlOpenOptions({
httpUrlOpenTarget: 'externalBrowser',
});
파라미터
options필수NotificationUrlOpenOptions
푸시 알림 URL 오픈 옵션입니다.
httpUrlOpenTargetHttpUrlOpenTarget
URL 오픈 대상입니다. 다음 세 값 중 하나입니다.
'internalWebView'— 기본. SDK 내장 WebView 로 표시합니다.'externalBrowser'— OS 외부 브라우저로 열기. App Links / Universal Links가 등록된 호스트는 OS가 자기 앱으로 라우팅합니다.'none'— SDK가 URL 을 열지 않습니다. 호스트 앱이 알림 클릭 핸들러로 자체 처리할 때 사용합니다.
응답
Promise<void>Custom HTML 인앱 메시지
Custom HTML 인앱 메시지를 사용하면 자유로운 형태의 인앱 메시지를 표시하고, 앱 내에서 커스텀 액션을 처리할 수 있습니다.
개인화 변수
HTML 본문에 {{ 변수명 }} 문법으로 유저 속성을 참조할 수 있습니다. 정의되지 않은 변수는 빈 문자열로 대체되므로 default 필터로 기본값을 지정하는 것을 권장합니다.
<h1>{{ name | default: "고객" }}님 안녕하세요</h1>
<p>{{ phone_number }}</p>
사용 가능한 전체 변수 목록은 블럭스 콘솔의 Custom HTML 에디터에서 확인할 ��수 있습니다.
변수 출력과 default 필터만 지원합니다. {% if %}, {% for %} 등 제어 태그나
upcase, round 등 다른 필터는 사용할 수 없습니다. 잘못된 문법은 인앱 메시지
저장 시 차단됩니다.
유저 속성 값에 포함된 HTML 특수문자는 서버에서 자동으로 이스케이프되어 표시됩니다. 따라서 유저 입력값을 변수로 사용해도 XSS 위험이 없습니다.
BluxBridge API
Custom HTML 인앱 메시지 내에서 BluxBridge 객체를 사용하여 SDK와 통신할 수 있습니다.
BluxBridge.triggerAction()
BluxBridge.triggerAction(actionId, data?, shouldDismiss?)
파라미터
actionId필수string
액션 식별자입니다. 커스텀 핸들러에서 어떤 액션인지 구분하는 데 사용됩니다.
dataRecord<string, any>
액션과 함께 전달할 데이터입니다. 기본값은 빈 객체({})입니다.
shouldDismissboolean
인앱 메시지를 닫을지 여부입니다. 기본값은 true입니다. 즉, 별도로 지정하지 않으면 액션 호출 시 인앱 메시지가 자동으로 닫힙니다. 인앱 메시지를 유지하려면 명시적으로 false를 전달하세요.
사용 예시
<!-- 기본 사용: 닫기 버튼 (shouldDismiss 기본값 true) -->
<button onclick="BluxBridge.triggerAction('close')">닫기</button>

<!-- 커스텀 액션 호출 (기본적으로 인앱 닫힘) -->
<button
  onclick="BluxBridge.triggerAction('share', { url: 'https://example.com' })"
>
  공유하기
</button>

<!-- 인앱 메시지 유지: shouldDismiss를 false로 설정 -->
<button onclick="BluxBridge.triggerAction('like', { itemId: '123' }, false)">
  좋아요
</button>
shouldDismiss의 기본값이 true이므로, 대부분의 버튼 클릭은 자동으로 인앱
메시지를 닫습니다. 비동기 작업 후 수동으로 닫아야 하거나, 인앱 메시지를 유지한
채 여러 액션을 처리하려면 shouldDismiss: false를 사용하세요.
BluxBridge.resize()
인앱 메시지의 크기와 위치를 변경합니다. 두 가지 방식을 지원합니다.
resize()를 호출하면 인앱 메시�지가 지정한 크기만큼만 화면을 차지하고, 바깥 영역은 뒤쪽 화면의 터치가 그대로 전달됩니다. 호출하지 않으면 인앱 메시지가 전체 화면을 덮어 뒤쪽 UI가 동작하지 않으므로, 배너처럼 일부 영역만 차지하려면 반드시 resize()를 호출해야 합니다.
배너 모드 — 화면 상단 또는 하단에 배너 형태로 배치합니다.
BluxBridge.resize({ height, location });
파라미터
height필수number
배너의 높이(px)입니다.
location필수'top' | 'bottom'
배너를 화면 상단에 배치할지 하단에 배치할지 지정합니다.
절대 위치 모드 — 화면의 원하는 위치에 자유롭게 배치합니다.
BluxBridge.resize({ width?, height?, top?, bottom?, left?, right? })
파라미터
widthnumber
인앱 메시지의 너비(px)입니다. 지정하지 않으면 화면 전체 너비를 사용합니다.
heightnumber
인앱 메시지의 높이(px)입니다. 지정하지 않으면 화면 전체 높이를 사용합니다.
topnumber
화면 상단으로부터의 거리(px)입니다.
bottomnumber
화면 하단으로부터의 거리(px)입니다.
leftnumber
화면 좌측으로부터의 거리(px)입니다.
rightnumber
화면 우측으로부터의 거리(px)입니다.
사용 예시
<!-- 배너 모드: 하단 배너 -->
<button onclick="BluxBridge.resize({ height: 80, location: 'bottom' })">
  하단 배너
</button>

<!-- 절대 위치: 하단 바 -->
<button
  onclick="BluxBridge.resize({ height: 70, bottom: 16, left: 16, right: 16 })"
>
  하단 바
</button>

<!-- 절대 위치: 우상단 토스트 -->
<button
  onclick="BluxBridge.resize({ width: 320, height: 60, top: 20, right: 20 })"
>
  토스트
</button>

<!-- 절대 위치: 좌하단 플로팅 -->
<button
  onclick="BluxBridge.resize({ width: 200, height: 64, bottom: 80, left: 16 })"
>
  플로팅 위젯
</button>
절대 위치 좌표는 safe area(시스템 바) 안쪽 영역을 기준으로 적용됩니다(iOS는
0.2.14부터). width/height를 지정하지 않으면 기준 영역에서 해당 축의
여백을 뺀 값으로 자동 계산되므로, left와 right를 함께 지정해 너비를
정할 수 있습니다. 0.2.14 미만의 iOS에서 env(safe-area-inset-*) 값을
좌표에 직접 더해 사용했다면 업데이트할 때 그 보정을 제거하세요. Android에서는
width/height 없이 다시 호출하면 이전 크기가 그대로 남으므로, 호출할 때마다
필요한 옵션을 모두 전달하세요.
BluxBridge.close()
인앱 메시지를 닫으며, 선택적으로 특정 기간 동안 다시 표시하지 않도록 설정합니다.
BluxBridge.close(daysToHide?)
파라미터
daysToHidenumber
인앱 메시지를 다시 표시하지 않을 일수입니다. 생략하거나 0을 전달하면 닫기만 합니다.
<!-- 7일간 보지 않기 -->
<button onclick="BluxBridge.close(7)">7일간 보지 않기</button>

<!-- 1일간 보지 않기 -->
<button onclick="BluxBridge.close(1)">오늘 하루 보지 않기</button>

<!-- 닫기만 -->
<button onclick="BluxBridge.close()">닫기</button>
클릭 추적 (data-blux-click)
data-blux-click 속성을 사용하면 요소 클릭 시 자동으로 inapp_opened 이벤트가 전송됩니다. 인앱 메시지 내 버튼 클릭률을 추적할 때 사용합니다.
<!-- 클릭 시 inapp_opened 이벤트 전송 -->
<a href="https://example.com" data-blux-click="main-cta">자세히 보기</a>

<!-- 버튼에도 사용 가능 -->
<button data-blux-click="secondary-cta" onclick="...">확인</button>
data-blux-click 속성이 있는 요소를 클릭하면 inapp_opened 이벤트가
전송되지만, 인앱 메시지는 닫히지 않습니다. 인앱 메시지를 닫으려면
BluxBridge.triggerAction('close')를 호출하세요.
addInAppCustomActionHandler()
Custom HTML 인앱 메시지에서 BluxBridge.triggerAction() 호출 시 실행될 핸들러를 등록합니다. 여러 핸들러를 등록할 수 있으며, 등록 순서대로 실행됩니다.
const unsubscribe = BluxClient.addInAppCustomActionHandler((event) => {
if (event.actionId === 'share') {
	// 공유 로직 구현
	Share.share({ url: event.data.url });
} else if (event.actionId === 'navigate') {
	// 화면 이동 로직 구현
	navigation.navigate(event.data.screen, { id: event.data.id });
}
});

// 핸들러 제거
unsubscribe();
파라미터
handler필수(event: InAppCustomActionEvent) => void
커스텀 액션 핸들러 함수입니다.
event.actionId필수string
액션 식별자입니다. HTML에서
triggerAction()의 첫 번째 인자로 전달한 값입니다.event.data필수Record<string, any>
액션과 함께 전달된 데이터입니다. HTML에서
triggerAction()의 두 번째 인자로 전달한 값입니다.
응답
FunctiondismissInApp()
현재 표시 중인 인앱 메시지를 프로그래밍 방식으로 닫습니다. 비동기 작업 완료 후 수동으로 인앱 메시지를 닫아야 할 때 사용합니다.
BluxClient.addInAppCustomActionHandler(async (event) => {
if (event.actionId === 'share') {
	await Share.share({ url: event.data.url });
	// 비동기 작업 완료 후 수동으로 닫기
	BluxClient.dismissInApp();
}
});

// HTML에서 shouldDismiss: false로 호출
// BluxBridge.triggerAction('share', { url: '...' }, false);
응답
voidsetInAppUrlOpenOptions()
* React Native SDK 0.2.13 이상에서 지원됩니다.
인앱 메시지의 http/https 링크를 클릭했을 때 SDK가 어떻게 열지 정합니다. 기본은 SDK 내장 WebView 로 열기이며, 외부 브라우저로 열거나 자동 오픈을 막는 옵션을 제공합니다. 딥링크나 그 외 커스텀 스킴은 본 정책의 영향을 받지 않고 native SDK 의 기존 외부 앱 라우팅을 그대로 따릅니다.
옵션 값은 호스트 앱이 한 번 호출하면 native 측 저장소(Android SharedPreferences, iOS App Group UserDefaults)에 저장되어 콜드 스타트 후에도 유지됩니다. 알림용 setNotificationUrlOpenOptions와는 별도 키로 분리되어 있어 인앱과 알림 정책을 독립적으로 설정할 수 있습니다.
인앱 메시지의 URL 오픈 동작을 설정합니다.
await BluxClient.setInAppUrlOpenOptions({
httpUrlOpenTarget: 'externalBrowser',
});
파라미터
options필수InAppUrlOpenOptions
인앱 메시지 URL 오픈 옵션입니다.
httpUrlOpenTargetHttpUrlOpenTarget
URL 오픈 대상입니다. 다음 세 값 중 하나입니다.
'internalWebView'— 기본. SDK 내장 WebView 로 표시합니다.'externalBrowser'— OS 외부 브라우저로 열기. App Links / Universal Links가 등록된 호스트는 OS가 자기 앱으로 라우팅합니다.'none'— SDK가 URL 을 열지 않습니다. 인앱 메시지는 닫히고 클릭 트래킹은 정상 발사됩니다.
응답
Promise<void>setInAppClickedHandler()
* React Native SDK 0.2.13 이상에서 지원됩니다.
인앱 메시지의 http/https 링크가 클릭됐을 때 호출될 콜백을 등록합니다. 호스트 앱이 자체 라우터로 URL을 처리하고 싶을 때 사용합니다. 핸들러가 등록되어 있으면 SDK는 URL 자동 오픈을 건너뛰고 콜백만 호출합니다. 클릭 트래킹(inapp_opened)과 인앱 닫기는 정상 수행됩니다.
핸들러가 등록되지 않았을 때는 기존 setInAppUrlOpenOptions 정책(기본 'internalWebView')을 따릅니다. Custom HTML 인앱의 BluxBridge.triggerAction() 경로는 본 핸들러의 영향을 받지 않습니다.
인앱 메시지의 링크 클릭 콜백을 등록합니다.
BluxClient.setInAppClickedHandler((inApp) => {
if (inApp.url) {
	// 호스트 앱의 자체 라우터로 URL 처리
	myRouter.navigate(inApp.url);
}
});
파라미터
handler필수(inApp: BluxInApp) => void
인앱 메시지 클릭 핸들러 함수입니다.
inApp필수BluxInApp
클릭된 인앱 메시지 정보입니다.
id필수string
인앱 메시지 식별자입니다.
urlstring
클릭한 링크의 URL 입니다. URL이 없거나 빈 문자열인 경우
undefined입니다.
응답
Promise<void>